Unlike some of its predecessors, the latest version of the Microsoft operating system – Windows 10 – seems to have a lot more success. And there are more than just a few reasons behind that. After the unfortunate release that Windows 8 was – for a lack of better wording – and even in spite of its desperate attempts to remedy some of the issues that the original build had created via the major 8.1 update, Microsoft seems to have taken everything from scratch.
Whether the reason behind it was the company’s excellent method of advertising the new release, the fact that Windows 10 finally answered to so much customer feedback or the ease of upgrading itself, statistics say that right now, this OS is installed on more than 220 million computers and devices. And now that Microsoft is shutting down support for Windows 8, the timing couldn’t be better for you to consider upgrading to the latest version of the operating system. Not to mention that the ‘free’ tag on this OS is only available until July 29th 2016.
And yet there are still so many individuals out there who, albeit are willing to upgrade, are still facing difficulties in the process. Whether it’s because this is the first time that Microsoft opts for this method of upgrading or due to the vaguely confusing and sort of unnecessary steps that you have to go through, chances are you may be still struggling to upgrade even now, months after its official release.
Common Windows 10 Issues – Reserving the Free Windows 10 Upgrade
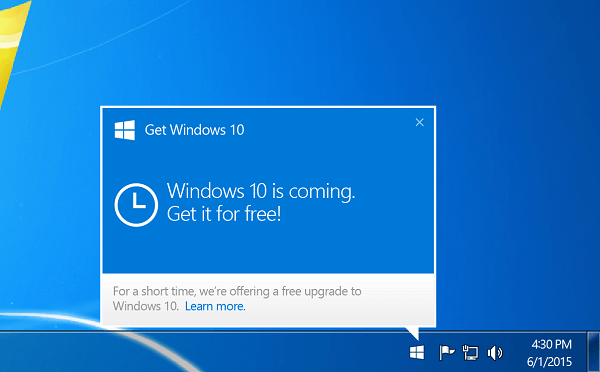
I’ve heard of countless cases in which someone was not able to upgrade simply because they never got the notification that Microsoft pushes to devices if they fulfill the prerequisites. I currently own 4 different computers and laptops in the house and that is something that happened on two of them.
However, just for safe measure, first you should make sure that you qualify for the upgrade. According to Microsoft, only genuine Windows 7 and Windows 8 copies are eligible for the free upgrade. However, a detail that ends up being missed many times is the fact that you have to update to the latest Windows 7 Service Pack 1 or Windows 8.1 versions in order for you to receive the prompt to upgrade to Windows 10. You should also make sure your machine has the hardware specifications required for the new operating system.
As you may occasionally encounter a glitch where your device refuses to display the notification even if it’s properly updated, the key is to turn off your automatic updates then turn them back on. After running its updating course (which may require some restarts of your computer), you should soon spot the update flag onto the bottom right task bar of your screen.
Common Windows 10 Issues – Installing your Reservation of the Windows 10 Upgrade
This is something else that is not unheard of for users who did reserve their copy of Windows 10 but either postponed it or could literally not find it at all. There are two possible answers to that issue: one could be easily outside of your power as Microsoft is rolling out the upgrade copies in waves; if your reservation was made later than others, there are some chances that your copy will also arrive a little later, though that is not always necessarily the case.
The other option you’re presented with is to try and rush it by grabbing yourself a copy using the Windows 10 Download Tool. That will allow you to create an USB flash drive with the OS on it, also coming with the capability of doing a clean install instead of the default upgrade option that Microsoft offers you.
Common Windows 10 Issues – Getting a Clean Install of the Windows 10 Upgrade
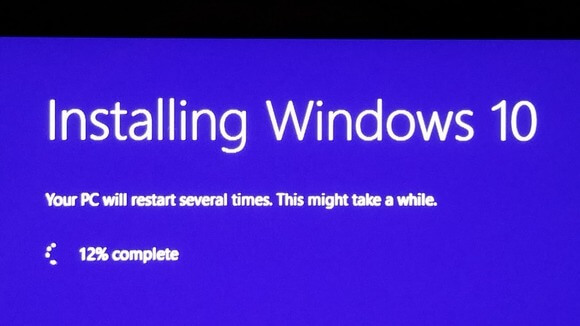
If you do things by the book and by the progressive series of steps that Microsoft has designed to make the transition easier for you, you will not at any point get the option to do things such as format your OS’ partition for example. Instead, it will retain all of your already installed programs and documents by replacing the core files needed by Windows 10 while also saving you a backup of the previous operating system just in case.
But that does not do very well with solving registry issues and a lot of underlying malware or adware you may have been subjected to without really knowing. That’s when a clean install is always a neat idea.
While a normal install would just use the kit that you download and do everything by itself without you really needing any manual assistance, a clean install requires you to download the Windows 10 Download Tool. Once you’ve selected your OS’s version and downloaded the image after selecting the ‘Create installation media for another PC’, you can either burn it on a DVD or on an USB Flash device.
After all of the above is done, plug in your USB Flash device or set the DVD you used into the tray and restart your computer. As soon as it’s coming back on, press either F2, F12 or the Delete button (it depends on system) in order to enter BIOS. Set your DVD drive or USB port as your primary booting choice then follow the walkthrough. Select ‘Clean install’ from the options and hit the format button when you select the partition you wish to install your new Windows 10 on before you proceed.
Alternatively, you can very well attempt to use the in-built method of getting a clean install, however it’s safe to know that this method does not allow you to do things like repartition your hard drives for example.
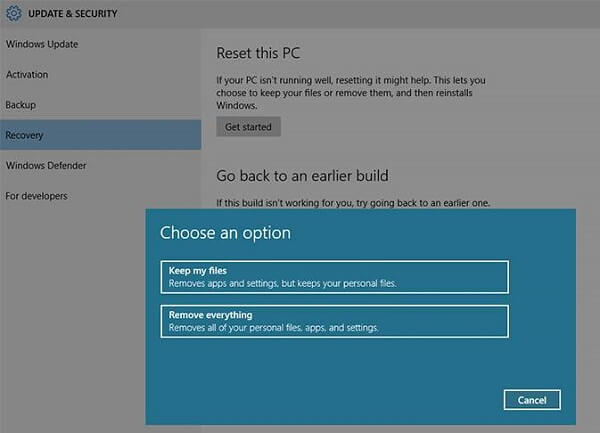
- Hit the start button and locate ‘Settings’
- Select Update & Security from the list
- Hit Recovery
- Hit Reset this PC and select the Remove Everything option from the list.
Common Windows 10 Issues – Finding Your Windows Key During the Windows 10 Upgrade
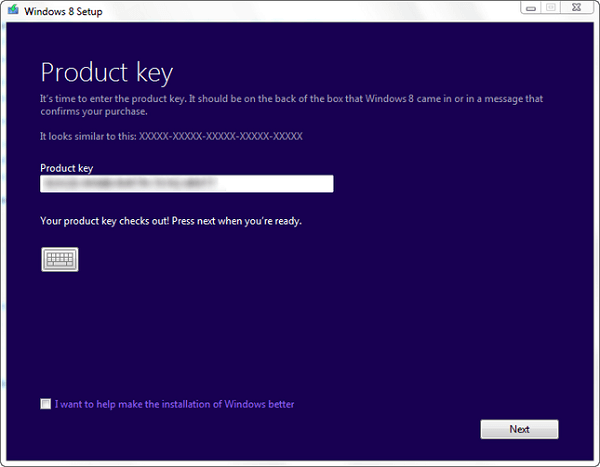
Though during a normal, default install, you will most likely not be prompted to enter in your Windows serial key number, a clean install for example will require that information from you. Ever since Windows 8.1 was released, Microsoft gave up the physical copy of the key idea and instead chose to always maintain it into the system’s BIOS so it can be automatically loaded when you reinstall your OS. At least that is the case with some of the devices that came with the operating system preinstalled.
When upgrading to Windows 10, you will basically be using that exact same key to get your new license. If you bought a physical version of your previous operating system, you will have to whip it out and look for the license key inside the box.
If your device came with an operating system preinstalled, the label containing the key should be placed somewhere onto the device itself: the bottom of your laptop or the back of your desktop’s tower for example.
If you’re using the latest Windows 8.1 version, the key is only embedded into BIOS and even if you manage to extract it, it bugs out and cannot be used in the Windows 10 installation. Sadly, the only method to work around this is to install the Windows 10 upgrade twice like this:
- Download the upgrade to Windows 10 kit
- Do a normal install so your new Windows 10 key is generated and encrypted into your BIOS. Just follow through the steps, do not make any custom modifications to the installation process.
- Follow the steps for a clean install after Step 2 is completed.
Common Windows 10 Issues – Various Obstacles in Getting the Windows 10 Upgrade Going
At any point before or as you’re trying to upgrade your operating system to Windows 10, you may get a number of issues. Here is a list of the most common ones that you could encounter.
- Common Windows 10 Issues – Not enough space for installing the new operating system.
Even though the installed version of Windows 10 is smaller than the installed version of Windows 8 for example, you may encounter this issue especially when dealing with small-sized SSD hard drives for example. Even if the installation kit doesn’t take up more than about 3 GB of space by itself, even that small amount may make the difference. It’s best that you use a DVD or flash drive instead, even if you don’t go for a full, clean install.
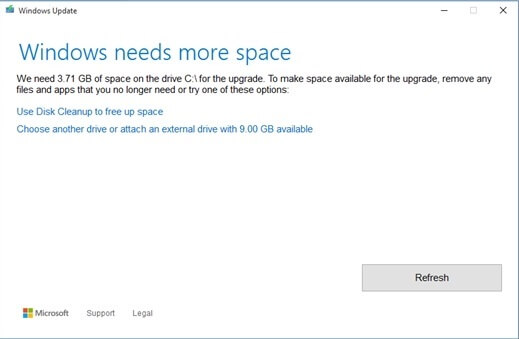
- Common Windows 10 Issues – Not enough space after installing Windows 10
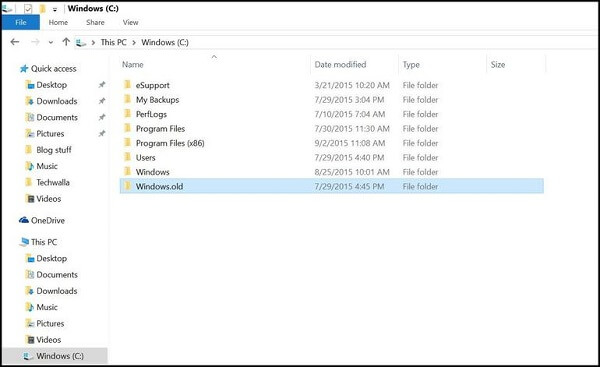
As you may have noticed earlier, it was mentioned that when you upgrade to Windows 10, the installation process also saves up a backup of your previous operating system in a folder called Windows.old. So in case you find yourself struggling with space right after the upgrade, that is most likely why.
Even if you’re certain that you won’t need your backed up version any longer, it’s wise to quickly copy it on an external drive or somewhere else that is safe just in case you run into various issues afterwards. After all that is said and done, you can safely remove the backup from your computer and free up some space.
As a side note, the backup version of your previous operating system is automatically deleted from the system in 30 days.
- Common Windows 10 Issues – Windows 10 is not genuine

This is an error that occurs when attempting to install the new operating system upgrade through manual workarounds that did not imply you getting the installation kit through traditional means. If you have not used your very own, personal upgrade reservation and/or are not using a genuine version of Windows 7/8/8.1 at the time of installation, chances are you will be getting this error.
Sadly, there’s not much you can do about it without any kind of purchase. As long as you keep getting the error, it means that your copy is illegal or simply a trial version that you won’t be able to enjoy it to its full potential. You can fix that by purchasing a valid key for either of the aforementioned operating system or straight out a brand new Windows 10 key directly from the Microsoft website.
By simply clicking on the notification flag that your Windows is not genuine, you will immediately be guided to where you can purchase a key from.
- Common Windows 10 Issues – Reverting to your previous operating system
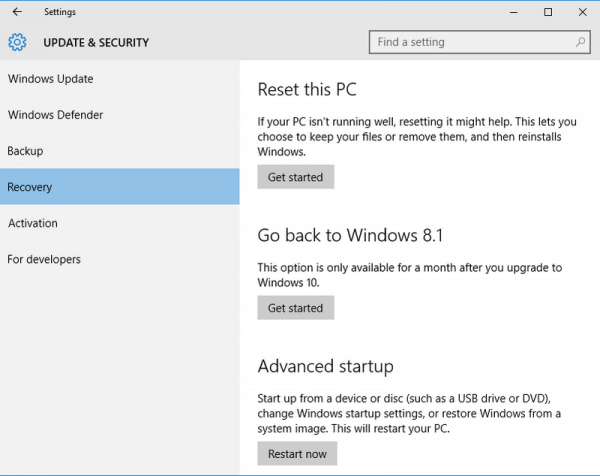
Whether you’re getting compatibility issues or simply aren’t as happy with the Windows 10 upgrade as you expected, you can easily revert to your previous version using the recovery tool. As long as you haven’t exceeded the 30 day period that the automatic backup will survive for, you can dig it out and revert to the way things were before by following these steps:
- Hit the start button and locate ‘Settings’
- Select Update & Security from the list
- Hit Recovery
- Press the Go Back button
Do note that if you have opted for a clean install, the system will no longer have access to the automatic backup file and your only chance to revert is if you saved up a copy of it on an external drive. If that is the case, you can load it and use it with the steps mentioned above.
- The mysterious king of Windows 10 Issues – the ‘Something happened’ error
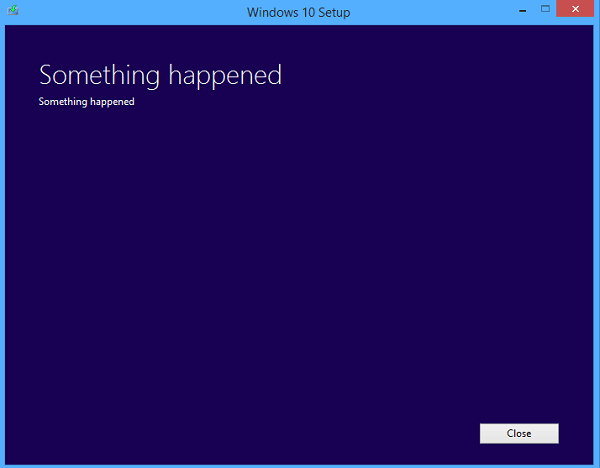
The infamously ambiguous error is difficult to track down and nail because it really holds no other information than literally ‘Something happened’. It’s not very clear why this happens in the first place and you’re most likely to encounter it at the very beginning of the upgrading process. Various people have managed to find these two workarounds it.
Method A: Press Start and go to Control Panel. In the Clock, Language and Region folder, select Region and click on the Administrative tab. In this window, click on the Change System Locale button and set it to English (US). Restart your PC and the installation should now work.
Method B: This method is for the users who have experienced this error when attempting to create the Windows 10 install media. This is usually caused by missing administrator privileges of the account that you’re using to create it.
Download and install the Windows 10 Download tool. Make sure you’re logged in as an administrator if there are multiple accounts on the machine you are doing this on. If you’re unsure whether your account has the administrator status or not, simply restart your PC and log in as administrator.
Hit Start and type in Windows 10 Download directly. Before hitting enter once the system located the needed file, right click on it in the list and select Run as Administrator from the drop-down menu. Then proceed through the installation and media creation wizard normally.
- Common Windows 10 Issues – Battling the We Couldn’t Install Windows 10 0xC1900101 – 0x30018 error
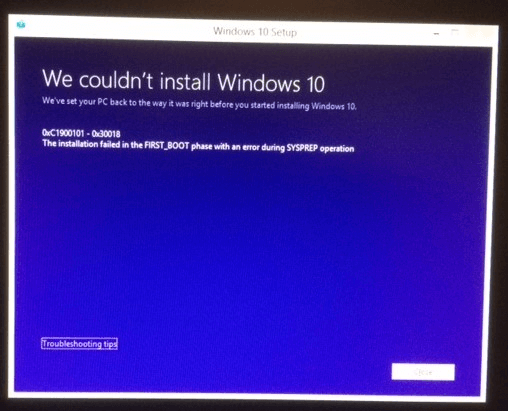
This particular error seems to be popping around whenever a driver or piece of security software is incompatible with what the installation kit is meant to do. If you are encountering it, your best chance of fixing it is to let the computer restore itself to what it was before you started the upgrade then turn off your antivirus, if any, your wireless connection and remove any unnecessary devices you may have plugged in (controllers, extra hard drives, USB flash devices, etc.).
As an extra step you may want to run a quick check in your Command Prompt. Make sure you are using an account with administrator privileges, hit Start and type in ‘cmd’ then open the Command Prompt app. Type sfc /scannow in the new window to make sure that all drivers on your computers are in good state.
If there are any other issues you may be running into when trying to upgrade to Windows 10, let us know in the comments and we’ll try to find you a fix!
