Argyll Free Press

Growing News Network

Saturday, February 14, 2026
Log in
  • Business
  • Finance
  • Sports
  • Tech & Science
    • HP Envy 4500 Review
    • LG Optimus 170 Review
    • iPod Touch 6th Generation Review
    • HTC One M8 Accessories Set-up
    • Surrealist Games You Must Play
    • Hisense Sero 8 Review
    • Dell Latitude e7440 Review
    • HP Laserjet 1536dnf mfp Review
    • Garmin Fenix 2 Review
    • Skype Vs Viber
    • Best Video Conferencing Software
    • Sony mdr 1r Headphones Review
    • Canon Rebel t3i Review
    • Sennheiser Momentum 2-0 Review
  • Travel
  • Headlines
  • Health
  • United States

More than 25 iOS 9 Tips and Tricks

December 30, 2015 By Michael Turner Leave a Comment

iOS 9 Tips and Tricks Header

A little over 3 months since the original version of the iOS 9 has come out and I still find myself discovering new things you can do on it every other day. While the “initiation” guide that you normally get with any new version only walks you through major changes before you decide to exit it and never return, there are just so many new, small things that get added with every following version. A great number of them you probably will never use or are too situational to bother with. However, you never know when the situation arises that one or two of them might just save you some time.

And just earlier this month the latest version of the operating system – iOS 9.2 hit our software menus, bringing even more fixes to previous issues such as syncing bugs and also added a few more neat tricks to pave our way even further into what real technological assistance is supposed to do. Now keep in mind that some of the iOS 9 Tips and Tricks we will be listing here are only available for users of multiple Apple devices (e.g. iPhone and iPad or iPhone and Mac PCs) while others may only be available on the latest iPhone 6 models.

Considering there’s a lot of information to take in and shockingly diverse categories of them too, we’ll be dividing them in chapters so you can find your particular point of interest faster.

iOS 9 Tips and Tricks – Ease of Access

iOS 9 Tips and Tricks – Switching from Android to iOS

iOS 9 Tips and Tricks - Switching from Android to iOS

Switching carriers is one thing. Upgrading your iPhone has been made amazingly easy over the years. But if you find yourself in the position where you’re switching from an Android to an Apple phone, the transition may feel downright confusing and difficult to pull off without a serious time investment.

Luckily, with the iOS 9, a nifty app made its way on Google Play. Once you download it on your Android device you can choose to save your photos, contacts, messages and such. When you set up your new iPhone – more specifically, during the setup phase itself – all you need to do is tap the Move Data from Android option.

iOS 9 Tips and Tricks – Making good use of the SD Lightning Adapter

iOS 9 Tips and Tricks - Making good use of the SD Lightning Adapter

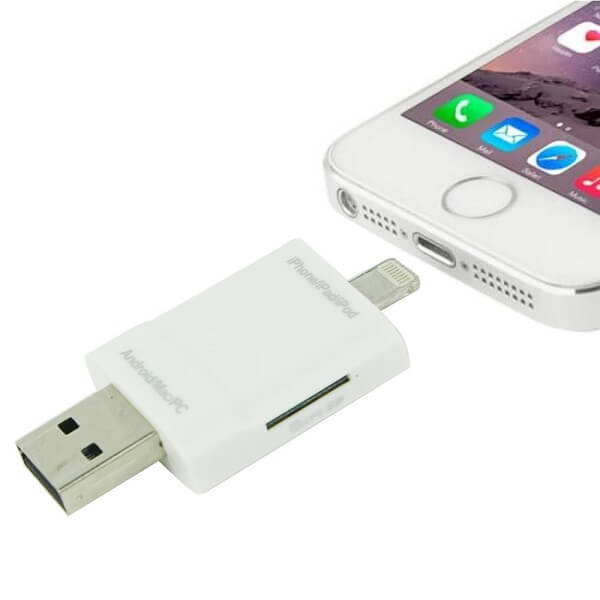
What better way to transfer photos from your SD card or camera than directly, by using the SD Lightning Adapter. Once iOS 9 hit, it has been made possible for you to use the SD to Lightning and USB to Lightning adapters together in order for such transfers to be possible.

iOS 9 Tips and Tricks – View the state of your battery of your other Apple products from a single device

iOS 9 Tips and Tricks - View the state of your battery of your other Apple products from a single device

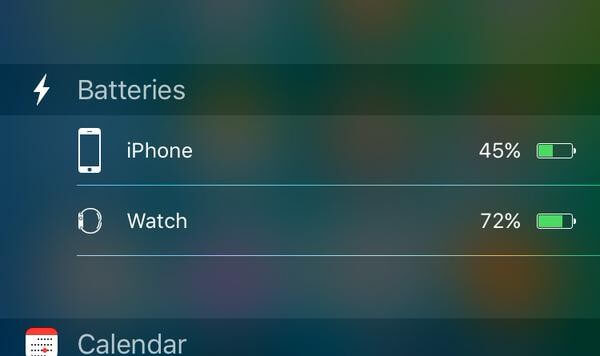
I’m not going to scramble my mind out to figure out when you would use something like this, but it’s always good to know it’s a possibility. Basically, you can view the battery life of any of your synced Apple devices from any of them. By pulling down your notification center when the phone is unlocked, you can scroll all the way to the bottom, hit Edit and tap the + button next to Batteries.

iOS 9 Tips and Tricks – Handoff, now just a tap away

Handoff is not new to the iOS but can easily be listed as one of the most useful things you can have if you own more than just one Apple device. In case you haven’t used it yet, it allows you to pick up where you left off if you’re writing an email, a document and even a message and continue it on a completely different device.

iOS 9 makes it all even easier by adding a fast access option to Handoff straight from your multitasking screen. Double tap your home button and you’ll find the shortcut at the bottom of your screen, right below all of the currently open apps.

iPad’s own Selection of iOS 9 Tips and Tricks

There is a bunch of things that the iOS 9 update brought to the latest iPads only – meaning you won’t be able to enjoy them on your phone or iPod. For the few lucky iPad users out there, here’s what we gathered.

  • Text selection made easy (finally). I kind of wish this had been made available for the iPhone as well as selecting text is a handful and I will most likely just give up unless it’s vital for me to copy paste fragments somewhere. On the iPad however, iOS 9 allows you to use multitouch and mimic the way you would usually use a trackpad on a laptop. That way you can use two fingers to select the entire body of text you wish with a minimal amount of struggle.

iPad’s iOS 9 Tips and Tricks •	Text selection made easy

  • Pop-out videos. You know how the YouTube app has the capability of minimizing your currently watching video while you browse for other ones? That is now possible on your iPad, regardless of the source of the video, as long as it’s an Apple app or Hulu. The way you do it is via the button that you can see on the bottom right of the screen when you’re playing a video or by using the video button, alternatively.
  • Multitasking at its best. You can now run two apps at the same time on your iPad Air 2 via the Split View app. The only downside of it is that not all the applications out there support it. However, the way you get that going is by swiping from the right after you’ve opened your first app of choice, select the second you want to open from the grid then drag the slider to the middle of the screen.

iPad iOS 9 Tips and Tricks Multitasking at its best

  • The new iPad Keyboard. While the keyboard has definitely been improved on the mobile phone version of the iOS 9 as well, the iPad received a fair amount of extra attention. The on-screen iPad keyboard has added some new options to cut, copy and paste as well as easy to access shortcuts to various apps.

iOS 9 Tips and Tricks – Interface and Notifications

iOS 9 Tips and Tricks – Improved Passcodes

Not much to mention here other than the fact that the iOS 9 now supports passcodes as long as 6 digits. All you need to do is proceed to change it from the Settings > Touch ID & Passcode submenu.

iOS 9 Tips and Tricks – A Back Button is a Good Button

iOS 9 Tips and Tricks - A Back Button is a Good Button

No more constant double tapping the home button to get from one app to another and get lost in the process when you’re trying to multitask. The iOS 9 added a very simple, very useful back button in the top left of your screen so you can easily return to the previous application you were using.

iOS 9 Tips and Tricks – Notification Grouping

While there’s only one more option added to the iOS 9 other than the default sort by date and time, it’s something. By going to Settings > Notifications and turn on the Group by App setting, you can now view them sorted by each separate application instead.

iOS 9 Tips and Tricks – Low Power Mode

iOS 9 Tips and Tricks - Low Power Mode

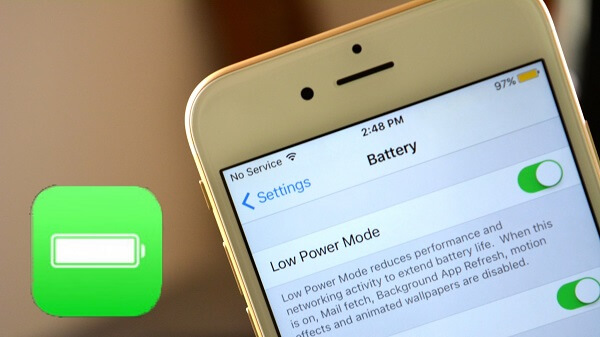
If left on default options, your phone has probably already started notifying you that its battery is running low when it reached 20% and 10% respectively. But in case you haven’t found it yet, you can actually turn this mode on manually via Settings > Battery and enabling or disabling it at the very top of the screen.

iOS 9 Tips and Tricks – Searching Improvements

I can’t say that the iOS settings menu is the most intuitive of them all and you may also always realize that you spend a long amount of time to find specific settings in all the submenus that is has. The search function of the iOS 9 is now featured in the Settings App as a standalone spin-off. You can find it when you’re scrolled up all the way to the top.

In addition, iOS 9 also allows you to comb out the apps that you don’t want showing up as results on your searches to maintain a higher level of relevance and faster search times. You can do this via Settings > General > Spotlight Search.

iOS Tips and Tricks – Calling & Texting

iOS 9 Tips and Tricks – App & Contacts Suggestions

Depending on how you choose to access your search menu in the new iOS 9, your iPhone will offer you suggestions for various things. If you swipe from the top in the home screen, you will get a selection of 4 apps that the operating system registered you use most. Swipe from the left to right from the first page of the home screen and you’ll be granted an additional row of suggestions – this time contacts; by tapping on a suggested contact, you’re prompted to choose whether you want to Call, Text or just view that contact’s profile.

iOS 9 Tips and Tricks – Keep better track of your voicemail

The iOS 9 allows you to not only save your voicemail but also share it if need be. By sharing it, I mean anything between sending it to someone as a message, sharing it on social media and sharing it to your other devices. The way you do it is by saving it from the Phone app and tapping on it if you wish to share it.

iOS 9 Tips and Tricks – Unknown callers?

iOS 9 Tips and Tricks - Unknown callers?

This is one piece of information that truly falls into the second category of the iOS 9 Tips and Tricks selection. Sadly, it’s not 100% reliable but a decent attempt an uncovering the identity of an unknown caller that you haven’t saved into your contacts. It requires you to link your e-mail app or apps of choice to your Apple Mail. If the caller has his or her phone number attached to their e-mail, it will display as a suggestion while that person is calling you.

iOS 9 Tips and Tricks – Texting Emojis and Optimizing Your Options

Very small chance that you haven’t used or at least seen the huge amount of emoticons that pop up when you attempt to change the keyboard language layout via the button that is in the bottom left of the screen in the Messages app.

If you feel that the shake to undo is more of an annoyance than something you find yourself actually using, you can turn it off now from the Settings > General > Accessibility > Shake to Undo option.

iOS 9 Tips and Tricks – Siri

Siri seems to be taking turns with either being amazingly useful or an absolute danger to new operating system builds (remember the security flaw where people were able to access private information off of a locked phone via Siri back in September?). Regardless, now that all of these issues have been fixed, we can actually enjoy all the upgrades Siri received.

iOS 9 Tips and Tricks – Siri Reminders

You can now tell Siri to remind you of more than just the time you have to wake up. You can make her remember things such as specific web pages or things you’re looking at and also have her set up a reminder for a specific date, time or location. That way you can easily pop up the TV guide for the evening as soon as you come home for example.

iOS 9 Tips and Tricks – Siri almost knows it all

iOS 9 Tips and Tricks - Siri almost knows it all

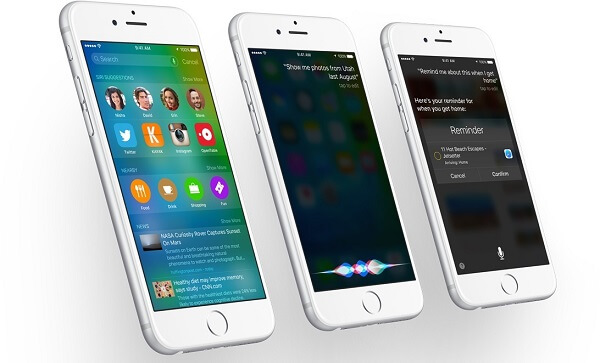
While Siri has been able to find locations for you before, she can now even gather more specific details such as the working hours of markets and restaurants. As a side note, I’ve found most of these utilities of Siri by just fiddling with it and experimenting with asking various things, you should try it too!

Along with the iOS 9’s smart way of categorizing your photos, varying from selfies, location-specific albums, date-specific folders and so on, you can ask Siri to pull up a particular set of pictures such as the ones you took on the 31st of December or the photos you took last summer in Italy.

iOS 9 Tips and Tricks – Make Siri discreet

In order to not have her shout out her results of whatever you have her do when the situation calls for, you can set Siri up to not speak out loud if your phone is turned on Silent. That can be done via Settings > General > Siri > Voice Feedback > Control with Ring Switch.

iOS 9 Tips and Tricks – Settings

iOS 9 Tips and Tricks – WiFi Assist

There was a feature added with the iPhone generations starting at iPhone 5 and above that made your phone choose and juggle between available connections to ensure you get the best and fastest internet browsing you could. By that meaning that your phone would automatically switch to 4G when your WiFi connection faltered or became slow and choppy. Sadly, you couldn’t turn that off nor did the phone tell you it was happening which could result in painful amounts of extra charges or an entire month worth of your data plan gone out the window.

Thankfully, you can now prohibit the phone from making that call by itself by going to Settings > Cellular > WiFi Assist and turn it off.

iOS 9 Tips and Tricks – Improved Battery Usage Information

iOS 9 Tips and Tricks - Improved Battery Usage Information

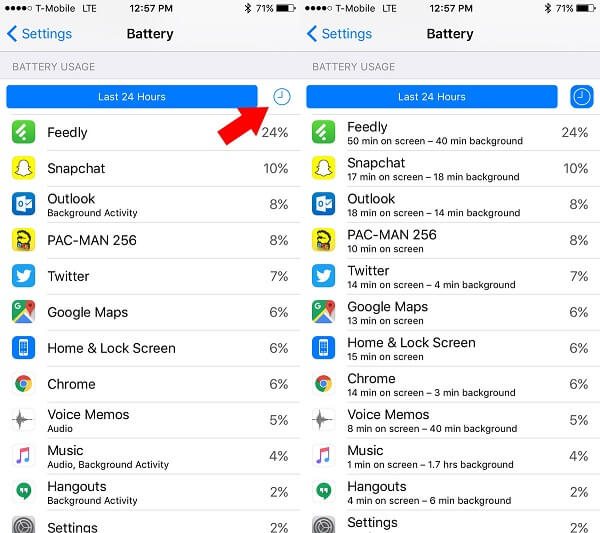
If you feel like your battery life is slower than usual and aren’t sure why, the iOS 9 offers you a detailed history of how much of your power certain apps have been using either over the past 24 hours or past 7 days. You can access the list via Settings > Batteries, all the way at the bottom.

iOS 9 Tips and Tricks – Touchscreen Assistance

There are a few things you can change about your display’s responsiveness to touch. By turning the core option on from Settings > General > Accessibility > Touch Accommodations (third group of options), you can adjust things such as hold duration and tapping assistance.

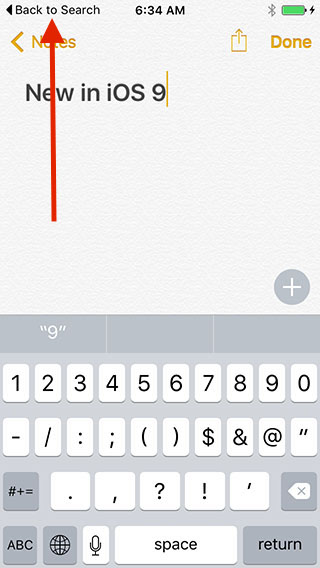
iOS 9 Tips and Tricks – Notes

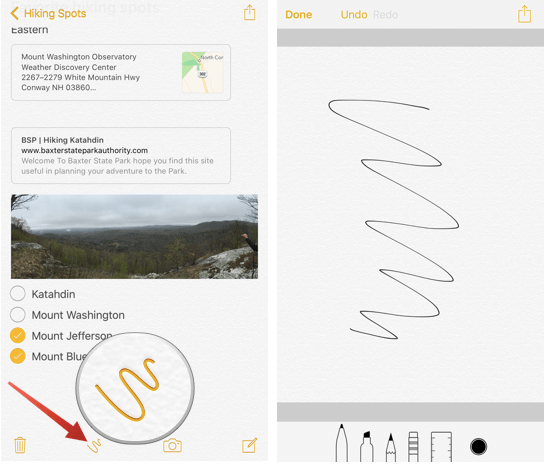
iOS 9 Tips and Tricks – Doodling in Notes

Sadly only available in the newer Apple products such as the iPhone 6 and above, you can now pull out an entire arsenal of colors and drawing tools and doodle inside the Notes App. Ok, so maybe it’s not an arsenal, but you’ll be given a market, pen or a pencil as well as a few colors to use. Some people may find this more useful than having to type things down.

To make things even more interesting, you can also add photos to your notes now. Additionally, you can share photos you find in your browser directly into your notes for easy access.

iOS 9 Tips and Tricks - Doodling in Notes

iOS 9 Tips and Tricks – To-Do Lists

iPhone 6 and above also allows you to make entire to-do lists in your notes that automatically add check icons which you can tap next to every row. You’ll find the to-do list option when you open a new note, the first icon on the left right above the keyboard.

iOS 9 Tips and Tricks – Safari

Safari has had its fair share of improvements too, while I can’t call them all groundbreaking. There is an option that you can make use of to turn off frequently visited websites so they don’t show up when someone else may be using your phone. You can disable displaying this information by going to Settings > Safari > Frequently Visited Websites and uncheck the option.

The more relevant change that Safari has seen is a decent amount of customization that was brought to reading webpages. Those revolve around font size, background colors and more. It’s a nifty little thing that you can use when reading blocks of text that can quickly tire your eyes out, especially when the display’s brightness is set to high.

iOS 9 Tips and Tricks – E-mail

iOS 9 Tips and Tricks – More Doodles!

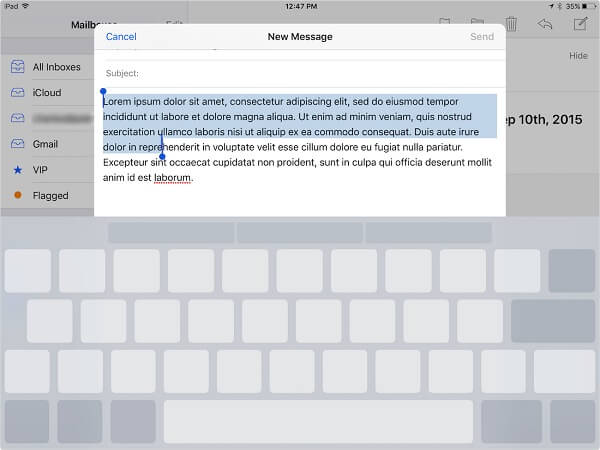
Not exactly considered doodling per se, but the latest iOS 9 allows you to take notes and draw directly onto email attachments. What better way to make your point and quickly reply to the sender of the email than to quickly mark the content you’re referring to? In order to make use of this feature, all you need to do is to open the email with the attachment in question, tap and hold on the image or document in question then select Markup and Reply and a selection of options at the bottom of your screen will appear.

iOS 9 Tips and Tricks – Working with your emails easily

iOS 9 Tips and Tricks - Working with your emails easily

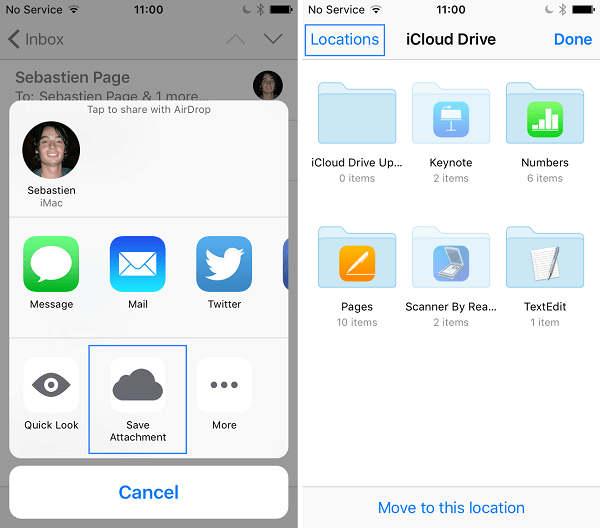
There’s a quick and fast method of keeping your mail attachments safe and accessible from any Apple device you are logged on. Similarly to how you can do to import photos in Notes, you can tap and hold the attachment in question and you get an option to save the attachment directly to your iCloud (it doesn’t say it will save it to the iCloud, but you can quickly recognize it thanks to the trademark iCloud logo).

Image Source: 1, 2, 3, 4, 5, 6, 7, 8, 9, 10, 11, 12, 13

Filed Under: Headlines Tagged With: Apple iOS 9, ios 9 features, ios 9 functionalities, ios 9 tips and tricks

Facebook, Google, Twitter Hate Speech Agreement

December 16, 2015 By Michael Turner Leave a Comment

Facebook, Twitter and Google logos.

The new Facebook, Google, Twitter hate speech agreement reached today is the conclusion of the German government’s efforts of the past months to eliminate hate speech from social media platforms in the country.

In accord with the agreement, these three companies will delete any hate speech present in discussions under their control within 24 hours.

Which, as you can imagine, raises the much dreaded specter of censorship. Or at least censorship should be a much dreaded specter in a democratic state.

However, the issue is a tad more complicated, as human affairs often are.

Because the German government’s efforts to curb and hopefully eliminate hate speech completely come amid the growing tensions caused by the refugee crisis.

The fact that this government has to deal with more than 1 million refugees received this year alone, for which it is directly responsible, makes it understandable that they have to take practical, effective measures like the hate speech agreement, and not just put out declarations and urge the population to play nice.

Also worth taking into consideration is that hate speech is illegal by German law, meaning hatred promoted against any segments of the population. So asking foreign companies to forbid users on German territory to use it is not that much of a stretch.

Still, the problem of censorship remains. Where does freedom of speech end?

According to Heiko Maas, the German Justice Minister:

When the limits of free speech are trespassed, when it is about criminal expressions, sedition, incitement to carry out criminal offenses that threaten people, such content has to be deleted from the net. And we agree that as a rule this should be possible within 24 hours.

Germany has asked Facebook to help it better manage the refugee crisis by fighting online racism on its platform since September this year and they initially refused.

That prompted the German government to put on more pressure and in the past few months it started investigating four Facebook executives, including Martin Ott, the managing director for all of Central, Northern and Eastern Europe, claiming they had not done enough to control hate speech and are directly responsible for Facebook’s failure in this direction.

Facebook responded at the time by saying that Martin Ott and all of its employees in Germany have done nothing wrong, performed their duties flawlessly and the accusations lack merit.

Now, it seems Facebook, along with Google and Twitter, have finally decided to agree to the German government’s request. Whether because they see eye-to-eye or because they finally caved to the pressure is hard to determine.

But starting today, users of these social media platforms will be able to report hate speech so that it gets deleted within 24 hours. Specialist teams have been set up to deal with such reports.

Whether for good or for ill, this is happening. What are your thoughts?

Image source: 1.

Filed Under: Headlines Tagged With: Facebook, Facebook Germany, Facebook Google and Twitter, Facebook hate speech, free speech, Germany hate speech agreement, Google, hat speech, hate, hate speech agreement, speech, Twitter

LG Optimus L70 Review – The Pretty-Looking Fund Saver

December 15, 2015 By Michael Turner Leave a Comment

LG Optimus L70 Header

No matter how appealing they make them look and how many discounts and offers you find on the market, the cold hard fact is that the holidays are nearly upon us and there’s not much more we can afford. While we were looking for an affordable option for this year’s possible smartphone gifts, we came across the LG OPTIMUS L70 that downright shocked us with its abysmally low price.

Getting it without a contract will probably cost you less than getting a much newer smartphone on a whole two-year commitment contract. Sure, it probably isn’t any jaw-dropping embodiment of state of the art technology or mind-boggling performance, but it’s still a touchscreen phone that will get the job done. The fact that it can connect to 4G networks in a huge plus too.

There’s only so much you can expect from a phone of this caliber. But the things that it manages to do, it does well. Considering the very low price class that it falls into, it can make for a great last minute gift for your kids or other family members, especially if they prefer pre-paid cards over long-term commitments.

Pros:

  • Android KitKat OS
  • 4G capability
  • Nice design
  • One of the most affordable android phones

Cons:

  • Lacks a number of more or less needed features
  • Small and rather dark display
  • Low storage space
  • Mid-tier hardware components

LG Optimus L70 Design

LG Optimus L70 Black

The first time I saw an LG OPTIMUS L70 on the shelf I actually thought to myself that it’s not a bad looking phone. And it really isn’t: it may not innovate anything in terms of design and doesn’t even come close to the gigantic phones of our brimming with technology days, but there’s really not much to complain about when it comes to the looks of this small smartphone. It may not reach the overall size of the current trends, but still exceeds the iPhone 5’s size. For its 127.2 x 66.8 x 9.5 mm dimensions, it manages to pack a 4.5 inch display and sums up a 67.8% screen to body ratio. That’s not too much to speak of and mostly caused by the relatively large bezel, especially at the top and bottom.

However, the LG Optimus L70 has an aspect ratio that you’re most surely not used to; while it’s not that exact ratio, it’s mostly similar to 16:10 layouts, making it look and feel wider than your usual smartphone. Surprisingly, even considering the 9.5 mm it scores in thickness, it’s not difficult to hold at all and even feels comfortable doing so. With the only downside that typing texts on it for example will probably make it more than difficult for you, especially if your hands are more on the large side. It doesn’t come in much heavier than your average Joe phone, weighing only 124 grams; if anything you’ll find it even lighter than most of nowadays’ smartphones – but that’s mostly because of its smaller scale.

I mentioned earlier that the LG Optimus L70 doesn’t innovate much in terms of design. That is mostly because looking at the LG Optimus L70 makes me think of some older Samsung phones, before gigantic displays became the current fad. The way its front face looks, featuring touch-sensitive Back and Options buttons, with your clickable Home button slapped in the middle is reminiscent of Samsung Galaxy S2 or Samsung Galaxy S3 Mini. But it actually ends up looking sleeker and more delicate than that, thanks to the larger display and sharp but slightly curved and softer corners. You’ll even notice the front facing camera along with its own LED flash on the top right corner, making it look anything but outdated.

LG Optimus L70 White Edges

The edges of the phone, even if a lot thicker than what we’ve grown accustomed to with all these new smartphones aspiring to be paper-thin soon, are well rounded to increase grip on it and feature most function buttons. They’re set all around the metallic frame going all around the phone: the right side features a single sleep or power button, while the left hosts the volume rocker and a Quick Launch button – something that will come in very handy and that you won’t find on many other smartphones, especially budget models.

The top is where you’ll find the regular 3.5 mm headphones jack – a more suitable location considering that the phone is relatively small and pocketing it is actually an achievable feat; I’ve yet to own the pair of jeans that will fit anything of the likes of iPhone 6S Plus in their pocket. The bottom of the LG Optimus L70 is where you’ll find the microUSB charging port. The phone was released in the first quarter of 2014; it’s an overstretch to hope for anything such as Type-C USB charging for it.

LG Optimus L70 Bottom

The back of the LG Optimus L70 is a bit of a marvel, at least for the black version that we’ve used for this review. While the only other LG Optimus L70 white variant features a plain and matte back cover, the black one features a hexagonal mosaic pattern on its back in different shades of gray. That gives off a very fun grainy look to the back that’s a lot more appealing than your regular classic black. On the back rests the rear camera sensor, much larger than its front equivalent with its very own LED flash as well as the LG and metroPCS logos. Still, if that is not to your liking, LG put at your disposal the possibility of purchasing an LG Optimus L70 case.

LG Optimus L70 Matte White

LG Optimus L70 Light Cases

One of the catches of the LG Optimus L70 is the back cover. Unlike most of the smartphones these days, you actually get to remove the back cover and thus gain access to the battery compartment and more. The reason I say more is because under the battery you’ll find two very important slots: both the Mini SIM and the microSD slots.

Sadly, there seems to be a downside to most good things in this world: you can an easily accessible and just as easily replaceable battery, but that means that every time you want to swap out your microSD card, you’ll have to turn the phone off and take out its battery in order to do it. Plus, you’d have to go through the entire process of taking the cover off as well if you opt for any of the LG Optimus L70 cases.

LG Optimus L70 Extra Protection Cases

So to sum it up, design wise the LG Optimus L70 is quite nice to look at even if it doesn’t come up to par with what you see in the flashiest, bright lit shelves these days.

LG Optimus L70 Display

I will start off this section by straight out saying that the LG Optimus L70 display may come as a bit of a disappointment to some as it’s far from bright and highly detailed. At 4.5 inches, the display isn’t as large as one might be used to, but you won’t – at any point – struggle to read or view content on it. It makes up through width if anything, sporting a more unusual aspect ratio.

LG Optimus L70 Screen

The display is of the WVGA variety – abbreviation for Wide Video Graphics Array – and only sums up to a resolution of 800 x 480 pixels. That accounts for a 207 ppi pixel density value – far from one of the best you can find on a wide variety of hand-held devices. Because of that, watching movies or running graphic-intensive apps on the LG Optimus L70 is not the best experience you will get. The image tends to get a little pixelated at times and you may even find yourself noticing a fair amount of grain and light distortion towards the edges. I’m fairly unsure why that even occurs in the first place but it’s something to take into account.

The display is an IPS LCD capacitive touchscreen build, a fact that probably explains the relative brightness issues. Being the less expensive option for manufacturers, the IPC technology is also at fault for thicker devices. In essence, that means that you lose a fair amount of brightness and contrast potential at the cost of more natural looking colors. I’m going to stick to saying that viewing angles are decent but once again, not the best. The same goes for viewing what your screen has to display when in sunlight.

LG Optimus L70 Specs & Hardware

If there’s any way for me to sum up what kind of hardware you’d be getting in the LG Optimus L70, I’d have to stick to calling it mid-range technology. None of the components will wow you but they still are a relatively decent pick for the phone’s price range. The only downright frustrating issue with it is the storage space, but we’ll elaborate on that later on in the review.

The LG Optimus L70 packs a Qualcomm MSM8210 Snapdragon 200 chipset – making it a very old processor (it was released in in either 2010 or 2011 if memory serves well) that won’t be running any digital marathons soon. Thanks to the dual core 1.2 GHz Cortex-A7 core processing unit, you will be able to run most basic needs apps and it will serve you well when it comes to anything regarding emailing, net surfing and other less demanding applications. Put it to a multitasking stress test however, and the performance will become sluggish to say the least.

With the chipset comes the Adreno 302 graphics processing unit. This GPU will work just fine with basic games such as the likes of Angry Birds, but more demanding games from 2013 and onwards will not share the same fate. Together with the modest 1 GB of RAM, you should probably stick to basic multimedia and not get your hopes up for anything that is more demanding than that.

Now comes the part which I’ve mentioned in the intro and that is the storage space. The base amount you get is a rather shocking 4 GB hard drive only. Considering the operating system alone will clog up a portion of this, you’ll be left with little to none for your own necessity. On the bright side however, you do get the separate microSD storage which – albeit forcing you to open up the phone every time you need to swap out cards – can lend you a helping hand of up to 32 extra GB of storage space.

LG Optimus L70 Software

Straight from the factory, the LG Optimus L70 will come with preinstalled the Android 4.4 KitKat operating system. It’s not your regular stock Android version and instead runs the LG Optimus 3.0 user interface with its own twists and perks. You still get the regular Google apps without having to resort to applied skins and other third party applications. Your Chrome, Gmail, Google Plus, Hangouts and so on are the same as on any other Android device.

The Optimus user interface brings its own input to the party, giving you apps such as QuickMemo – a nifty little thing that will allow you to doodle and make notes directly on the images you can see on the screen. Another example is the QSlide 2.0 that reminds me of how YouTube works on mobile devices when you minimize the video you’re currently watching so you can continue browsing without having to close it off completely beforehand. The QSlide allows you to minimize some apps while you use something else or accessing your menus.

LG Optimus L70 OS

The Metro411 app that you’ll find is the touch that MetroPCS brought to the LG Optimus L70 and consists of a handy hub of nearby restaurants and businesses, inbuilt in your system so you don’t have to rely on websites or other third party apps that will eat at your already scarce storage space.

Sadly, there’s no upgrade to any of the newer Android models on the horizon, not even to the 5.0 Lollipop, so users will most likely not get to experiment the newer Android to its full potential.

LG Optimus L70 Camera

The 5 megapixel rear facing camera will do a great job as long as you don’t try to expand the photos you take to resolutions higher than its native 800 x 480 pixels. While the maximum resolution you can get is 2560 x 1920, with a default 2240 x 1344, the photos start looking a little grainy and they lose detail the more you enlarge it when viewing it on your computer.

This camera doesn’t employ the fastest shutter out there, forcing you to stand still a moment before the photo is actually taken. But otherwise, the photo quality ends up relatively good, clear and decently focused, even when in close range.

There’s a fun feature you’ll find in-built in the LG Optimus L70 phone. That is the voice-activated shutter that will know to take a photo when it hears queue words such as “cheese”. The software gives you a fair amount of settings and post-editing you can do such as 4 scene mode, Panorama, continuous shooting and much more.

The front facing camera is even less fascinating than the at least decent rear one. It does, however, give you the option of saving the photos you take in either landscape or portrait orientation but can only take photos in an even smaller resolution: 640 x 480.

Video recording is an option using both of the aforementioned cameras but don’t expect the next Hollywood movie to be shot with the LG Optimus L70. The quality of the videos shot with it will be underwhelming to say the least, ranging from resolutions that don’t exceed 800 x 480 for the rear camera and 640 x 480 on the front facing camera. At least that makes video conferencing possible, to a degree.

LG Optimus L70 Battery

LG Optimus L70 SIM & microSD

The phone promises between 11 and 12 hours of talk time thanks to its 2,040 mAh removable battery. It’s a decent power pack that will keep the phone going for a fair while, especially given the rather low maintenance display. Even watching videos will keep your battery away from the charger for several hours at a time. Form that perspective, the LG Optimus L70 is a great and reliable thing to have and not find yourself in the position where you always have to carry the charger around with you.

Charging it isn’t the lengthiest of processes either as you’ll probably not need more than 2-3 hours at most to get a full charge going.

LG Optimus L70 Verdict

So, to wrap it all up, by purchasing the LG Optimus L70 you’ll be granted with a great and reliable method of handling your daily businesses in terms of calling, emailing and most of the more basic apps. It’s a great phone that doesn’t overdo display size but in retrospect, you miss out on many features that more recent phones come with.

With a particularly power-hungry build and full access to Android-centric applications and feature, the LG Optimus L70 is worth taking a closer look at if you’re searching for a budget smartphone.

You can purchase the LG Optimus L70 from various online and retail stores. It’s listed at prices between $50 and $75 on most of the above, without a contract.

Image Source: 1, 2, 3, 4, 5, 6, 7, 8, 9, 10

Filed Under: Headlines Tagged With: android budget phone, android kitkat budget phone, LG budget phone, lg l70, LG Optimus L70, LG optimus l70 review

Routers Will Look Beautiful Thanks to Google

December 9, 2015 By Michael Turner Leave a Comment

After such a long time, routers will look beautiful thanks to Google.

The classic, professional design of the OnHub Shell is featured in this photo.

If you lost your hope that the Internet router in your home will ever fit in with your decor, you will be pleased to find out that routers will look beautiful thanks to Google. The company has started a campaign of personalizing OnHub routers.

Due to their tech, boring look, Internet routers have always been hidden in houses, either on shelves, under the desk or even outside the room. This will no longer be necessary. The OnHub routers already have a different look from other models, with their sleek and smooth design. Google wants to take one step further and produce more colorful designs, to fit into everyone’s homes.

In this regard, the company has presented three new types of items, with prices ranging from $29 to $39 on the Google Store. The first OnHub Shell is colored very elegantly in white and gold, while the second version is black and gray. The third one looks quite different with its wood texture.

The company had the bright idea of leaving the design in the hands of creative people, instead of pursuing the challenge itself. As a result, multiple designers attempted to design their personal OnHub Shells. The outcome is wonderful and unique: the routers can now look as fruit bowls, practical objects or have all sorts of shapes and colors.

The designers used various materials such as fur, paint or plastic. Google has encouraged everyone to follow their example and thus gather a nice collection of OnHub routers. If your creation is original and inspiring it can even end up in the Maker Gallery, alongside other featured models.

How can you design your own router? Google has created the Maker Packet program with lots of patterns and guidelines for you. It even supports 3D files. After creating your design, all that is left to do is share it along with the #OnHubMakers hashtag. Now all you would need is a 3D printer, but with a bit of luck your design might be chosen and placed on the market.

Apart from giving a nice touch to your home, the new designs also have a practical use: if you don’t hide the Internet router anymore, you will surely have a stronger WiFi connection. After so many years of bearing with non-attractive designs, routers will look beautiful thanks to Google.

Image Source: 1

Filed Under: Headlines Tagged With: onhub, router design, Routers Will Look Beautiful Thanks to Google

Pebble Steel Review – Affordable Simplicity

December 3, 2015 By Michael Turner Leave a Comment

Pebble Steel Review Smartwatch

In spite of it being a “new” trend that everyone seems to be getting ultra hyped about, smart watches are not all that new. Indeed, nowadays there’s an undeniable focus on making them even smarter than one would expect and play more roles than they should. But all that extra effort into packing an outstanding amount of hardware into a tiny screen that simply has to be touch-sensitive and brilliant doesn’t come in cheap. Take a look at the Apple iWatch for a second and you’ll see exactly what I mean. Then take a look at the Pebble Steel smart watch, which is a modest early 2014 production; the differences may look severe, but are they really if you stop to think about how you would really be using it? That is something we’ll be touching on in this Pebble Steel review.

Mostly due to the fact that it’s not a highly developed market yet, anyone can agree that most smart watches lack in actual utility. Sure, they can be used as an extension of your smartphone and can even handle some of the things that you would normally do through your mobile. But once again I have to give the Apple iWatch as an example – it’s great, it’s smart but… so many people have complained that it’s hard to accurately tap on the oh-so-bright-and-colorful screen and would rather just use their phone instead. Others have stated that while the watch may succeed in architecture and hardware as a smartwatch, it’s simply not great looking as a watch.

So all introductory details aside, what does the Pebble Steel do and what does it not? It syncs with your iOS or Android phone and pushes notifications to you and also give you a fair amount of information regarding a number of things while not looking overly large or out of place as a watch. It doesn’t, however, appease one’s wearable tech desires nor fares well with either generic or health apps (it can only hold a maximum of 8 at a time).

Pros:

  • Works with both iOS and Android OS
  • Waterproof
  • Classic yet classy
  • Does most of what you would expect from it

Cons:

  • Can’t even remotely compare to competition hardware standards
  • Limited on apps
  • Lacks fitness tracking sensors
  • Too simple for the tech-savvy

Pebble Steel Review – Design

The Pebble Steel smartwatch is a huge upgrade from the original 2013 Pebble watch – both visually and material-wise. It has upgraded its design with a much more attractive display, featuring fashionable indents on its top and bottom edges, reminding us very much of a designer watch more than wearable tech. If anything, the Pebble Steel will pass for a regular watch once you take a closer look at the screen and its functionalities.

Pebble Steel Review Variants

Pebble Steel Review Steel Variants

It comes in 4 variants on the official website by combining a Brushed Stainless steel or a Matte Black steel build with either the leather or metal bands. Regardless of what combination you go for, the Pebble Steel looks amazing, with a rugged and masculine but classy look. You can wear it with any kind of attire and regardless of the occasion; all things considered and it still ends up looking a lot less bulky and out of place than the Android Wear and Apple iWatch, measuring only 45 x 34 x 10.5 mm. its weight is very much in the green too, not exceeding 28 to 32 grams with the leather band – depending on the width of the band, which you can also customize when purchasing the watch. The Pebble watch steel band version does, however, go up to a weight of 56 grams.

Pebble Steel Review Front

One aspect that you surely won’t find in many other, if any smartwatch is the fact that the Pebble Steel is water proof; well, at least up to 5 ATM water resistance. You can take it with you regardless of weather conditions, in the shower and even when you go swimming. Even the steel band version, which does come at an extra $30 gets the same water friendly treatment. The leather Pebble Steel band may start suffering when exposed to water too often however.

Pebble Steel Review Water Resistance

The display won’t elicit a “wow” anytime soon considering that it’s a black and white screen and can’t match up to any of the colorful LCD panels used in the competitors’ smart watches. However, it comes at the upside of preserving a lot of the energy used by the watch, making the battery last much longer than your iWatch’s would.

You shouldn’t feel disheartened at the fact that it’s black & white, however; it’s much brighter than the ones you normally find in e-book readers, handling itself well in terms of crispness and vividness. Thanks to the Gorilla Glass coating on it, you won’t have any difficulty reading its display in sunlit nor night-time conditions either as it reduces glare to some extent. Sadly, the 1.26 inch display is not a touchscreen and only goes up to 144 x 168 resolution. However, considering that the entire menu is made up of text-based options, it is hardly something to worry yourself over.

Pebble Steel Review Variants

So in the absence of touch capability, you have to refer to the 4 buttons place on its sides: 1 on the left and 3 other on the right side. On this note, the bezel of the Pebble Steel smartwatch is not the thinnest you’ll find, scoring considerably on wideness as well as considerable height. The lone button is assigned to backlighting as well as entering or leaving sleep mode, while the group of 3 is your navigational help – allowing you to move up or down through the menu and select your choices. The watch can be taken out of sleep mode with a flick of your wrist as well, for the record.

Pebble Steel Review – Interface & Features

Before we delve into the actual utility that the Pebble Steel brings with it, we need to take a moment to mention a large plus that it comes with in comparison to its iWatch or Android Wear alternatives: the simple fact that it syncs and is compatible with both. If you purchase an Android Wear watch for example, you’d only be able to couple it with an Android phone. This versatility comes as a delight for users of both parties; sadly, Blackberry and Windows phone users are left out however.

Straight on the Pebble Steel watch itself, there’s not plenty you can do or fiddle around with. By using the central navigation button you enter the main menu – the hub that you’ll be able to select from a few types of settings or apps as well as view a history of your most recent notifications. Most of the Pebble watch features are accessible from here. You can also set alarms (yes, it does have a snooze button) from the Pebble Steel main menu as access your music playback feature.

The downside of the alarm system, however, is that it doesn’t make any sound whatsoever – if vibrations on your wrist can wake you up, then great. Otherwise, you should probably stick to your phone’s alarm.

The music playback can prove to have a couple of issues depending on the music app you use on your phone. There are some compatibility issues with various apps such as Spotify, where even if the watch will allow you to play, pause or skip through songs, it will show up as if it’s not finding any tunes. Confusing and a bit unprofessional to say so the least, but at least it works.

Connectivity is done solely through Bluetooth. As soon as you turn the Pebble Steel watch on for the first time you will be prompted to download the free Pebble app on your smartphone from either the App Store or Google Play. After you sync it to your device via Bluetooth, you can start setting up your user preferences and options.

Pebble Steel Review App

Pebble Steel Review App Menu

The mobile app menu is divided in two sections: one contains the smartwatch options, notification settings as well as two shortcuts to the app and watch face store. The latter contains other device settings as well as a help menu where you can troubleshoot and get guides on making the best of your Pebble Steel.

The notification menu is an easy to navigate menu that will allow you to tick or untick different categories of notifications that should or shouldn’t be sent to your watch; you can choose from a multitude of generic notifications, call or text notifications, calendar and even third party app notifications. The way they work on the smartwatch is through either flashing on the screen or a light vibration of the unit on your wrist; or both. For text messages for example, you’ll be able to read the content straight off of your smart watch’s screen, but given the small resolution you have to work with chances are you’ll be forced to scroll down a lot when attempting to go through the entire thing.

Pebble Steel Review Mobile App Notifications

Pebble Steel Review Apps

One issue that may annoy some users in regards to the shared notification system between the two units – your phone and your watch – is that sometimes your notifications will remain on one of them even after you’ve read or cleared them on the other. Thus, you’ll find yourself having to check and clear them from both devices to make them go away completely.

Pebble Steel Review – Apps

There’s a surprising amount of on-watch apps and even some games that you’ll find out there for the Pebble Steel. Yeah, you won’t be able to get the latest Asphalt on your watch but that’s hardly worrisome when you have a black and white screen on your wrist. What is worrisome, however, is the very limited space you get for apps and watch faces: instead of resorting to a limited amount of hard-drive space, the Pebble Steel uses a maximum of app slots instead.

While there’s no limit to how many apps you can download from the Pebble watch app store in order to, at one point, use on your watch, you’ll always have to switch them out and around using the mobile Pebble app. Most Pebble Steel apps you can get, you will most likely find for free and revolve around fitness apps, things such as Yelp or sports score apps that you don’t need a whole lot to navigate through. Naturally, there’s a considerable limit on the graphics that the apps can show.

Pebble Steel Review Apps

You can manage and work everything out regarding the apps you want to be able to use on your phone via the Pebble app cloud capability. Simply ticking apps marks them as something that you’ll be able to use on your watch once it’s done installing.

In terms of fitness apps, there’s a distinct lack of things you can actually track with the Pebble Steel – simply because it only features a pedometer and no other sensors such as an accelerometer, GPS or anything else that is normally used in activity trackers for example. However, you can download the native apps from FitBit or Jawbone UP in order to have your watch help you track your steps and sleep; that is, if you trust the results you will get from the Pebble Steel which may lack in the accuracy professional activity trackers are known for. However, the undeniable capability of accepting third party apps and even making them work somehow is yet another proof of just how universally competent this underrated smart watch really is. It may not do everything listed in the capability range of a Jawbone UP24, but it will at least give you a usable method of tracking a few things and then reviewing them on your phone.

Pebble Steel Review – Watch Faces

One of the relatively frustrating things about the Pebble Steel is the limited amount of app slots. And the worst part of it is that watch faces counts as a potential slot eater. Thus, there won’t be much customizing your watch on the fly given that you’d probably prefer to keep your app slots for something more important than watch faces.

Pebble Steel Review Watch Faces Collection

You can find a great number of watch faces on both the App Store and Google Play, most of which are free and a fun way you spice things up or change the generic look your watch gives off. On the upside, there’s a considerable amount of “app packs” you can find for your own Pebble Steel that will consist of both applications and watch faces bundled into one; a thoughtful gesture for users who really want more than just a pretty smartwatch.

Pebble Steel Review – Battery Life

Depending on what other kind of device you compare it too, the Pebble Steel can either be amazing in terms of battery life or not that impressive. In comparison to your regular smartwatch, aka iWatch or Android Wear, the battery of the Pebble Steel is great: while you normally have to charge your Apple or Android smartwatch basically every day, the Steel will last you somewhere around 5 to 6 days. It’s advertised to last up to a week but that seems a bit of an overstatement unless you’re really just using it as a fashion statement alone.

In comparison to some of the professional sports watches out there, the Pebble Steel can’t last as much as some of the more professional models do, but still handles itself pretty well. Charging is done via the magnetic slot that you can find on the watch’s left hand side, which ensures a satisfactory clip when the charger is connected correctly. Charging isn’t the speediest of processes however as it can take up to 4-5 hours. So you should probably get used to set it to charge while you sleep or otherwise it may be a bit of a nuisance if you have to be mobile during the day.

Pebble Steel Review – Final Conclusions

There’s a whole bunch of reasons some individuals will absolutely adore the Pebble Steel, while others will absolutely despise it. The watch is great for anyone who wants to own a smartwatch that is affordable and capable of sending notifications from their phone to their wrist, without the hullabaloo of tiny touch screens that you always tap incorrectly on. Fitness enthusiasts and tech lovers will, however, find the Pebble Steel unsatisfactory to say the least: there’s only so much you can do with it and actually feels like it tries really hard not to stand out as wearable tech and instead a fashionable watch with a technological secret.

You can purchase the Pebble Steel directly off of the Pebble website or through various retailers – both online and in-store. The price differs depending on the model that you aim for; the classic, leather band watch can be currently purchased for $159.99, while the stainless steel Pebble watch Steel band variant is available for $189.99. However, do keep in mind that there is a holiday sale at the current time – hence the reduced prices. Normally, you would pay $189.99 for the leather band Pebble Steel and $229.99 for the classier, longer-lasting stainless steel variety.

Image Source: 1, 2, 3, 4, 5, 6, 7, 8, 9, 10, 11, 12

Filed Under: Headlines Tagged With: affordable smartwatch, pebble steel review, pebble steel smartwatch, pebble steel watch

Garmin Fenix 2 Review – An Ultimate Sports Watch

November 30, 2015 By Michael Turner Leave a Comment

Garmin Fenix 2 Review Header

Now that we have covered a couple of entry-level fitness and activity trackers – more precisely the Jawbone UP24 and Jawbone UP 3 – it’s time to delve in more serious and advanced sports devices. More precisely, a full-fledged multi sports watch for either athletes or individuals who take fitness as seriously as one can. It’s no secret that the Garmin Fenix 2 is not your newest, high-end, state of the art sports watch – it is nearly 2 years old and has already been followed by two other models – the Garmin Fenix 3 and Fenix 4. But up to this day, it remains one of the best choices when it comes to tools that can help you track a great number of sports and activities.

With an amazingly and ample set of features and a sturdy, waterproof design, the Garmin Fenix 2 can withstand various types of sports and weather conditions. However, there maybe be one or two details about it that some may not appreciate as much – mostly the fact that its screen can only display a very limited amount of information about your activity and that most of the stats and feedback you can gather from it can be viewed via its native computer application. On the other hand however, the Fenix 2 is meant to serve as an athletic tracker, not a fashion statement or a smart watch; so to those involved that will not be the biggest of problems.

Garmin Fenix 2 Review Overview

There are two variants that you can purchase the Fenix 2 in: one includes a HRM-RUN heart rate strap and monitor, while the default one does not. The difference will cost you an extra roughly $45, which falls onto you to decide whether it’s worth that much or not – depending on whether you find the heart rate monitor worth having or not.

Things are very different from how they are with activity trackers – even the way it functions and the sensors it packs are different and meant to focus on another aspect of your lifestyle. It’s undeniable that the Fenix 2 is a little more complicated to use and will require a greater portion of your time to get used to it and get the most out of it, respectively. However, let’s see what this wearable piece of technology has in stock for us through this Garmin Fenix 2 review.

Garmin Fenix 2 Review – Design

Because compared to our previously reviewed Jawbone fitness trackers, the Garmin Fenix 2 features a monochrome LCD screen, the size of the devices are hardly comparable. The Fenix 2 is particularly large and a little bulky looking, but not in bad taste. For what a sports watch would normally aim in the professional line of business, the extra bulk could easily be considered ruggedness and sturdiness. And by all means that’s what it is: coming with a relatively thick wristband that has a high level of adjustment and is extremely solid and damage resistant – not likely to wear out very soon.

Garmin Fenix 2 Review Angles

Its casing is made of metal, giving it an extra layer of protection; however, that comes at the cost of increased weight and a pretty attention-drawing device. At its weight of 85 grams and its 49 x 49 x 17 mm dimensions it exceeds the grand majority of sports trackers, even the other models manufactured by Garmin. That is not all because of the materials used in its construction however – the fact that the Fenix 2 packs a large number of sensors in order to ensure a great amount of types of tracking accounts for that as well, a 3-axis accelerometer, a barometer and even GPS being only a few examples of the entire array.

The monochrome screen is a 70 x 70 resolution one, which isn’t particularly impressive by itself considering that other devices have a much more detailed screen. The Garmin Fenix 2 however, prefers to keep things simple. Because of that, the display will not get out of its way to looks attractive and appealing like many other examples of wearable tech do, and may leave a lot of room for improvement. For example the red backlight featured inside the watch doesn’t do an amazing job at making the display clear during the evening at all. The display is, however, transflective.

Garmin Fenix 2 Review Screen

Garmin Fenix 2 Review Right Buttons

All around the screen, there is a total of 5 buttons: 3 placed on the left side and another 2 on the right side, each owning various functionalities. The red top-right button is usually responsible for turning the watch on and off or start/pause the stopwatch for example, but naturally changing the functionality to some degree, depending on the type of sport you choose.

The back of the watch features a metallic surface screwed in in 4 places. On one side you’ll notice the four charging pins that can be hooked up to a special USB charger in order to keep the device running. The construction of this type of “charging port” is made to be waterproof. The charger clips on the back of the watch firmly and allows you to connect the watch to either your computer or to the power socket via an adaptor.

Garmin Fenix 2 Review Back

The strap of the Garmin Fenix 2 doesn’t come in more than one model unfortunately, but comes at a considerable length making it suitable for anyone, no matter the thickness of their wrist. it hooks up and stays in place firmly just like a regular watch, ensuring it won’t slip off when running or swimming.

Garmin Fenix 2 Review – Specs & Other Stats

Because the device isn’t very well versed in displaying graphic information regarding laps run or anything of that sort, it doesn’t require to pack too much memory in its construction. As a comparison, other sports watches such as the Epix can pack up to 8 GB of memory, whereas the Garmin Fenix 2 stops at 32 MB, out of which only 25 are actually usable. While this may sound disappointing for some, you should know that the Fenix 2 truly stops at just recording the relevant sports data – so considering that you won’t be enjoying any visual representation of your progress and statistics, there really wasn’t any need for larger amounts of memory.

I mentioned earlier that a great amount of the watch’s weight and size is responsible to its contents. That’s far from an understatement as the Garmin Fenix 2 really packs up a lot of hardware to make readings both varied and accurate. The 3 axis accelerometer that is used to get a good read of your placement and more importantly, motion, inside tridimensional space. Together with it come an altimeter, barometer, thermometer, compass, Bluetooth, and last but not least ANT+ connectivity.

Thanks to the Bluetooth 4.0 LE capability, your Garmin Fenix watch will be able to sync with your iOS or Android device and update information regarding your activity in real time, without requiring you to get home and connect your watch to the computer in order to view your progress. As a bonus, but not a relevant aspect for athletes or individuals who are considering this watch for sports purposes only, the Garmin Fenix 2 can be hooked up to serve as a proxy notification system for your texts, emails and even phone calls when synced with a compatible smartphone.

Garmin Fenix 2 Review Heart Rate Monitor

Additionally, the Fenix 2 has multiple other capabilities. Because it is GPS-enabled, you get the opportunity to record detailed mappings of your jogging sessions, your biking trips and even skiing. Furthermore, the previously mentioned water-proofing that the watch is back up by goes a much longer way than you’d expect: it’s rated to 5 atmospheres which means that you can dive with it to a maximum of 50-meter depth.

If you purchase the variant that includes the Garmin heart-rate monitor, it can serve for an even ampler reading of the quality and progress of your training and workouts, allowing you to keep things in check by just throwing a glance to your wrist.

Garmin Fenix 2 Review – Features

The number of sports the Garmin Fenix 2 known how to track and monitor is really something. And by that we don’t mean just measuring the distance travelled, but actual detailed information regarding each specific sport. Starting with the most classic of them all – running, cycling, swimming (both open water and pool), the Garmin Fenix 2 can also go as far as help you keep track and record of your gym workouts, various types of skiing and a wide variety of other sports.

As soon as you want to begin using it, all you have to do is hit the red button on the right side and you’ll be taken into the activity menu where you pick the sport you want – either one of the preset ones or custom. This part is vital as the watch needs to know which of its sensors it has to use to give you an accurate selection of readings.

Garmin Fenix Running

If used without the heart monitor, the watch can still provide you with a handful of useful stats regarding your running – whether it’s jogging or sprinting. To some degree, you will be able to customize what type of data you wish to see: pace, distance, time run, laps and even more advanced metrics such as cadence, vertical oscillation and ground contact time, removing the need of any other devices to track such things. The Garmin Fenix 2 has the capability to alert you based on a great number of factors. For example, if you use the heart monitor too, the watch will allow you to set up alerts to notify you when your heart rate goes above a certain threshold.

The heart rate monitor may sound like all it does is measure how fast your heart is beating, but instead it will actually provide you with a great amount of information, such as heart rate variation, calorie burn, VO2Max Estimation (the maximum amount of oxygen your body is capable of utilizing in one minute) and other types of readings. In realistic terms, most of us will probably never require this type of information, however for athletes for example, such a set of information can truly improve the quality of their training.

Garmin Fenix 2 Review Running Overview

When running, you can make use of a large number of features such as auto lap, auto pause or virtual partner. While the auto lap is just a method of keeping track of how much you’ve been running by setting a predefined distance to account for one lap, the auto pause is a clever way to make sure that your readings aren’t thrown off by the fact that your regular jogging route takes you across many intersections or stop lights: the watch will stop recording data while it detects you standing still. The virtual partner feature is basically a target pace that you can guide your running by, always knowing whether you’re behind or ahead of the speed that you set yourself to run at.

Lastly, a thing that’s worth knowing is the fact that the watch is smart enough to prevent loss of data or intermittence in readings. For example, if your jogging course takes you through a tunnel where you may lose the GPS signal, the Fenix will continue tracking by switching to the accelerometer, and switching back once you’re back out.

Garmin Fenix Cycling

The Garmin Fenix 2 gives you an ample set of readings when cycling too. With high customization levels that allow you to get accurate stats by setting up the wheel size and crank length for example, you can record your performance regardless of the bike you are using. You can either wear the watch on your wrist or set it up on your bike as well, by using a rubber mount for your bar which you can purchase for about $10.

You can set up the Garmin Fenix 2 to display a series of stats while you’re cycling, such as average speed, distance, time, average or maximum power and so on. The watch is usable with indoor, static bikes too but it requires a prior notification to using it so it may switch from the GPS sensor to the ANT+ speed and cadence one instead.

Garmin Fenix Swimming

This type of activity is split into two types of swimming – open water and pools, each earning you a different set of statistics recorded. You can switch between them after selecting swim in the activity menu, then opting for the appropriate sub-activity.

In terms of pool usage, the Fenix 2 will make use of the accelerometer, so it’s irrelevant whether the pool is somewhere indoors or outdoors. It does require some setting up in terms of recording pool length: the watch has a number of default pool sizes which you can select from but allows you to type in a custom size just as well. Once set up, you can go ahead and begin your session and only mark the task as complete once you’re done.

In terms of open water swimming, the Garmin Fenix watch uses both the GPS and accelerometer sensors in order to track your movements when underwater and above water level. However, because of the constant switch you may find that the readings are not 100% accurate and you will most likely end up using them as estimates rather than taking them for granted. Similarly to how you can set up the watch to count laps when you run, you can do with open water swimming: but instead use a starting and a finishing point as the base for the count.

Advanced workouts & Outdoor Information

The device will allow you to create custom workouts according to your routine in order to keep track of your daily performance. However, this can be done only via the Garmin Connect app and contain an endless number of activities – each with its own targets and durations.

Depending on what you’re planning to do, the Garmin Fenix 2 has a number of interesting details about the outdoors. For example if you’re out on an exploration adventure in the wilderness, the Garmin Fenix GPS watch will tell you the exact sunrise and sunset times so you have enough time to make it back before it gets dark. Similarly, it can display the hunting and fishing calendar.

Additionally, there is a number of features that can come in handy when trekking into unknown territory such as the area calculation that will record data as you walk or the breadcrumb mapping of your movements so you don’t get lost when you go hiking or travelling through less populated areas with the Fenix Garmin watch on your wrist.

Garmin Fenix 2 Review – Mobile App & Garmin Connect

Garmin Connect Mobile (GCM)

The greatest portion of your stats, set ups, and highly detailed information you will be able to view and customize via the Garmin Connect website variant. However, the mobile app – more commonly known as Garmin Connect Mobile – is the watch’s application that will require an Android 4.4 KitKat or iPhone 4S and above device. The application is free to download and is compatible with multiple Garmin products as well as several other.

The mobile application integrates with the larger host hub that is the online site Garmin Connect. However, as soon as you open it you will be able to see a short summary of tracked information, mostly consisting of step count, distance walked and calorie burn. The menu is accessible via the icon on the left side; here you’ll be able to find the Home, Community, Devices and LiveTrack submenus.

Garmin Fenix 2 Review Garmin Connect Mobile

The “Community” tab allows you to add and manage your friends, as well as view their posted information and stats as well as providing access to the Leaderboards. The online aspect is not transparent, meaning that you will be able to restrict the amount of information that others can view regarding your activity.

“Devices” not only gives you an extensive list of compatible devices to sync to, but also lists each device you have already paired up with the phone, allowing you to see separate sets of stats for each. There’s also a decent amount of configuration you can do to your device of choice regarding data upload.

“LiveTrack” allows you to make your data visible while you perform it, provided of course that you’re also carrying your phone with you on your workouts, also making it visible to select individuals following you. This way, your mobile app can help with giving you a more accurate reading of your running tracks, directly onto a satellite rendered map.

Garmin Fenix 2 Review Mobile Activity Summary

Garmin Connect Website

Every single statistic and piece of information recorded by your Garmin Fenix sports watch ultimately ends up here, on the Garmin Connect hub, accessible via your computer or tablet – provided it has an USB port. Once connected, the Garmin Express app will handle anything regarding data uploading and updating your Fenix 2’s firmware in order to make sure you make use of the latest features and fixes added to it.

The Garmin Connect dashboard has an undoubtedly steep learning curve, meaning that your first few experiences will most likely leave you not only confused but also having missed on numerous aspects and details the program can provide you with. There is a ridiculous amount of information that can be displayed in the program, which coupled with the fact that there’s no real tutorial that will teach you how to make use of all of it might make you reluctant at delving in it deeper than you have to.

Garmin Fenix 2 Review Home

Each activity recorded has a personalized list of records and details. For example a jogging session will display a Google Map-rendered depiction of your track, plenty of details regarding speed, timing, elevation, calorie burn – each being able to expand in a separate graph displaying progress over the entire length of the activity, and many other options such as comparing it to other activities, saving a log of it or even printing the details out.

Furthermore, each graph has a certain degree of customization of the data field that you wish to see, allowing you to pinpoint the areas of interest to you when the output of data gets confusing.

Garmin Fenix 2 Review Graphs

Garmin Fenix 2 Review – Battery Life

The Garmin Fenix 2’s battery life really depends on the power mode you select for it as well as the activity you undergo when using it. For example, activities that make extensive use of the GPS which updates your data every second and thus making for the most accurate set of readings, the battery will drain a lot faster than when the Fenix only uses the accelerometer for example. Factors such as losing GPS signal which forces the watch to try and regain it also end up draining the battery faster than usual.

So at high performance settings, you will most likely get somewhere between 15 to 16 hours of uptime with a full charge. On power saving mode – which consists of GPS updates at one minute intervals – you can get as much as 55 hours of uptime with a full charge. For anyone concerned, there is a portable battery pack that Garmin offers throughout their product selection that you can take with you.

Garmin Fenix Review – Final Conclusions

The Garmin Fenix 2 sports watch is overall a device that feels extremely capable, storing a high level of versatility in it. It is not the type of device most people will look forward to because it’s more so inclined towards intense fitness activity. The watch is ideal for users such as professional athletes or individuals who heavily invest in fitness, and not so much for occasional sport practices. Don’t get me wrong, you can very well use it for that as well, but it would be a waste of money for you considering that the Fenix 2 doesn’t come in cheap.

The watch itself comes with a particularly sturdy build, made for all intents and purposes, making it able to withstand a number of conditions for a wide array of activities. The high number of sensors make for an amazingly long list of sports and activities, allowing you to record very ample sets of details regarding each. The only real downside to the watch is the relatively confusing at first dashboard of the Garmin Connect website. It’s a lot to take in and even more to get used to until you can truly make use of the application properly.

You can purchase the Garmin Fenix 2 for $399.99 for the basic version and $449.99 for the Performer Bundle which includes the HRM-RunTM heart rate monitor. Any additional accessories for the watch such as mounts, cables, adapters, batteries etc. can be found on the Garmin website.

Image Source: 1, 2, 3, 4, 5, 6, 7, 8, 9, 10, 11, 12

Filed Under: Headlines Tagged With: fenix 2 multi sports watch, fenix 2 sports watch, garmin fenix 2, garmin fenix 2 review

Jawbone UP 3 Review – Taking Fitness UP A Notch

November 21, 2015 By Michael Turner 1 Comment

Jawbone UP 3 Header

Yesterday we took a good long look at what one of the first Jawbone fitness tracker had to offer. Things haven’t changed so much in terms of utility since the series began with the Jawbone UP and Jawbone UP24 iterations of the activity tracker wristband. However, the much newer Jawbone UP 3 has some considerable new upgrades that might just coax you into choosing it over its predecessor – despite being considerably more expensive.

Design-wise, the Jawbone bracelet has gone a really long way. Not only that it looks a lot more sleek and elegant than it used to, but the inside face of it features some new elements that we’ll touch down on some more, later. But it’s safe to say that the Jawbone series has been upgraded from simple wristbands to actually fashionable devices that can actually inspire wearable tech. However, the series still doesn’t feature a screen to display at least basic information; because some things never change, for some it will be good news to see that Jawbone hasn’t given up on its simplistic ideal. For others, the lack of a design that screams tech may prove to be a groan-inducing issue.

In comparison to the Jawbone UP 2 however, the Jawbone 3 comes with a major upgrade in terms of utility: heart rate tracking. And because the original generation of UP3 first came with a few issues that buyers reported with the clasp not holding, a second generation of the third Jawbone fitness tracker soon followed, improving on what it had lacked before.

Jawbone UP 3 Design

Jawbone UP 3 Simplistic Design

Put the Jawbone UP3 right next to the Jawbone UP24 that we have recently reviewed and things look drastically different. While the Jawbone wristband still doesn’t come visually close to wearable tech without displaying any sort of LED or LCD screen, it could very well be mistaken for a regular bracelet. The Jawbone UP wristband is still encased in medical-grade, hypoallergenic rubber. It looks and feels considerably more flexible than its predecessors did, despite still being limited on how far you can bend it. However, because the new design contains all of the underlying technology inside a central area of the wristband, the straps remain perfectly flexible. The top and bottom casings use anodized aluminum in their build.

Jawbone UP 3 Hardware

In terms of size and weight, the new Jawbone UP 3 doesn’t come in more than one model; instead, thanks to the adjustable clasp, there is only one size that will most likely fit anyone and feel as light and unobstructive as any of the previous Jawbone models – scoring only 29 grams in weight. The band can go from 140 mm diameter up to 190 mm. According to the principles that Jawbone has made all of their devices so far, the intention of a discreet device is still there, making this a very appealing gadget for some.

There are a lot more color variations than the company offered for previous models too: you can either pick one of the 6 regular colors – black twist, ruby cross, silver cross, sand twist, teal cross or indigo twist – or even aim for one of the two limited versions: black gold twist or twilight cross. Probably self-explanatory to a degree from the names of the models themselves, there are two patterns that you can get the UP 3 in: one is a padded 4-cross design on its front while the other depicts 4 lines snaking diagonally from bottom to top. Both are pretty fashionable and thought out in good taste.

Jawbone UP 3 Color Variants

There is one brand new detail that you will recognize if you’ve either used older Jawbone UP fitness trackers or read yesterday’s review of the UP24: the inside of the wristband features several metallic thumbs placed all around the inner circle. These are the sensors responsible for the Jawbone heart rate monitor – the way they work is a little different than the one you normally find on similar devices. The bioelectrical impedance technology packed in it – also one very similar to the one used to detect body fat levels – basically measures the resistance of body tissue to very small electric currents, something that is normally employed in EKG tests.

If worn correctly – and by that we mean that the 5 sensors should be in contact with your skin at all times for a good reading – the Jawbone UP 3 can do more than just measure your heart rate. Respiration rate, cardiovascular health levels, galvanic skin response and many others are just a few of how far the UP 3 can really go in terms of monitoring.

Jawbone UP 3 Heart Rate Sensors

One last thing that you will notice on the inside of the Jawbone UP3 is a very small magnetic surface that is used for charging the device via a USB charging cable that you can plug into your computer. Sadly the cable is abysmally small and may create a lot of discomfort when having to charge the wristband. Similarly to the Jawbone UP24, but considerably more stylish – there are LEDs hidden behind the rubber surface of the wristband’s front: this time around you can find 3 LED lights that display the current mode of operation – whether it’s sleep or activity. These LEDs only light up when you tap on the central part of the wristband several times so there isn’t a considerable amount of battery power used on a regular basis.

Jawbone UP 3 Magnetic Charger

Jawbone UP 3 Battery Charging

Last but not least, in terms of waterproofing it seems that the Jawbone UP 3 is faring a little better than its older brother, the UP24, but still not amazingly great. While it is not declared that it is splash proof, a more intense exposure to sources of water will prove highly detrimental to the hardware that the band has inside.

Jawbone UP 3 Features & The Jawbone App

Similarly to what its predecessors did in terms of fitness tracking, the UP 3 can do it just as well and most likely do it better too. It will keep track of how much and how often you move, walk or run, it will maintain a good reading of your sleeping patterns, give you a good idea of how your current lifestyle affects the health of your heart as well as give you an extensive list of ways to improve every of the above aspects of your life.

Considering the extremely minimal amount of interaction you can have with the band itself, most of the comprehensive information the Jawbone UP 3 will provide you will be done through the mobile application. Similarly to its brother, the Jawbone UP24 also requires an Android 4.4.3 device or beyond or at least an iPhone 4S or its successors in order for you to be able to download the free app. In addition to the iPhone, you can also get the app on the iPod Touch 5th Gen, as well as iPad 3rd Gen, iPad Mini or iPad Air.

Jawbone UP 3 Social and Stats

One of the best additions to the Jawbone devices that were adopted was Bluetooth connectivity. In the absence of a screen and direct interface that you can interact with to read your daily statistics, all of the control will reside in the mobile app. Thanks to Bluetooth connectivity, not only will it be done in a continuous, real time fashion, but it will also not require you to update your information manually – making it easier for you to keep track of your goals and make sure you reach them too.

Smart Coach

The one aspect that the Jawbone UP 3 fitness tracker once again stands out with is the “coach engine”, now known as Smart Coach. The most recent Jawbone update added some particularly clever features to it that give you an even more ample control of your progress. While the goal menu – titled “Today I Will” is pretty much the same as before, complimented by the Insight Engine that not only sends you notifications of your progress as well as give you constant personalized advice, there are some new things that we hadn’t seen before on the UP24.

The weight and mood tracking are sadly not something the UP 3 will detect by itself – having to either type them in manually or allow the Jawbone app to extract the information form compatible third party apps. However, the two are factors that are relevant to the app detecting patterns in your behavior that may interfere with your health on long term. Just like you could with the UP24, you can set various types of reminders via your smartphone that the app will handle by itself: you can either set it to notify you via light vibrations when you’ve sat down too long, or simply remind you that you still have 2 more miles to run in order to hit your daily goal.

One of the most important new features supported by the Jawbone UP 3 is the social aspect of it all. Now, you can create a team consisting of you and your friends and throw in the element of competition as motivation to perform better. Add the existence of leaderboards where you can view your friends’ scores, and the effect is multiplied. There is even a duel your friends to a common goal – over the length of 24 hours, 3 days or even 1 week. While competing with your friends can result in an overall improvement of your motivation, there is still a wide array of privacy settings that you can whip out to limit what you share.

Jawbone Heart Rate Monitor

When the original Jawbone UP 3 came out, its functionalities were limited. Following a Jawbone firmware update however, the device – surely, together with the app – became capable of monitoring both resting heart rate and passive heart rate. This means you will be able to monitor your heart activity as well as your cardiovascular levels continuously, giving you a better idea of this aspect of your health.

Jawbone UP 3 Application

However, there are two downsides to it: one is the fact that, naturally, you would have to wear the watch on at all times in order to get a good and relevant reading. Secondly, there is one occasional issue that may occur with the wristband not waking up automatically, forcing you to have to tap it to wake it up manually. Because of the way the algorithms work, setting it on the correct state is highly important. That is something that you may forget to do to begin with and is a relatively important part of getting accurate results.

Jawbone Sleep Tracking

The sleep tracking element of the Jawbone UP 3 hasn’t changed much since we’ve last seen it on the UP24. By using accelerometer-based sensors, it will detect when you have fallen asleep as well as when you wake up during the night. While the accelerometer is responsible for detection of the four stages of sleep (Wake, REM, Light and Deep), the bioimpendance sensors are responsible for keeping track of your respiration rate, heart rate, galvanic skin response as well as the temperature of your body.

Jawbone UP 3 Sleep Monitoring

Everything considered, you will not only be able to figure out why the quality of your sleep may be suffering as well as receive a helping hand in the shape of advice and encouragement on how to improve this aspect of your health.

Jawbone Fitness

The most basic feature that all fitness trackers have started off from was the simple count of daily steps and distance walked. Naturally, you are greeted to this part of the app from the main screen already, displaying a series of bars that tell you how much you have walked that day, followed by personal streaks and milestones. There are various parts of the app that will give you a better understanding of how to keep active as well as give you a nudge in the right direction.

Jawbone UP 3 Fitness Stats

The Jawbone 3.0 app makes it much easier to study the effectiveness of your workouts – whether we’re talking simply jogging or various more intense kind of sports. The app employs heavily detailed methods of calculating calories burned and displaying your own performance back to you – either directly or via personalized feedback.

Jawbone UP 3 App

The App employed to compliment the fitness tracker onto your mobile handheld device hasn’t changed a considerable amount since the Jawbone UP 3 release date. It has been getting a streak of constant improvements ever since it came into action, though most of its feature remain in place.

Tracking your diet works the same way as it did on the previous Jawbone devices: by scanning their bar codes, by browsing for them in the Jawbone database or entering them manually – via text or photo. If you put in the effort of keeping track of what you eat every time you do, you can be returned a comprehensive color code-based history of your dietary habits.

There is a wide variety of things you can track with the app and even more statistics you will receive as a result. It feels like the levels of optimization and personalization the app is capable of are highly extensive – giving you ample methods of calibrating the wristband to suit your typical habits. Considering the price to pay is the lack of a digital display to make it easier for you to track your stats on the go, I feel like the mobile application makes up for it tenfold.

Jawbone UP 3 Battery Life & Verdict

With the lack of said display, you can rest assured for the battery life on the Jawbone UP 3 is much longer than on competitors’ activity trackers. The 38 mAh battery packed inside the Jawbone tracker will normally last you about a week. While the short cable that is magnetically attached to the back of the band may feel very uncomfortable to hook up and keep level while charging, this won’t hinder you for too long as the charging process lasts very little – about 2 hours for a 0 to 100% charge.

Once again, I have to return to what we originally discussed about the Jawbone UP24. Whether this device is for you or not lies purely in what you expect from it. In terms of professional sports tracking, the Jawbone will not do – only being capable of a more casual approach to your daily activity, gathering information about your sleep patterns, your diet and other factors as well on top of the actual fitness statistics. Secondly, there’s also the issue of design: the Jawbone UP 3 makes a conscious effort to remain as subtle and discreet as possible – with no flashy design, no digital display or anything of the sorts, you wouldn’t be able to bask too much in the pride of wearable tech.

You can purchase the Jawbone UP 3 directly off of the manufacturer’s website for $179.99. the Limited Editions of the Jawbone activity tracker do require a preorder and they can take up to 3 weeks to be shipped to their destination.

 Image Source: 1, 2, 3, 4, 5, 6, 7, 8, 9, 10, 11

Filed Under: Headlines Tagged With: jawbone 3, jawbone up 3, jawbone up 3 activity tracker, jawbone up 3 fitness tracker, jawbone up 3 review, jawbone up3

Jawbone UP24 Review – First Steps of a Healthy Life

November 20, 2015 By Michael Turner Leave a Comment

Jawbone UP24 Header

Coming as an aid for your fitness life and more recently, the quality of some other aspects as well, the Jawbone UP24 is a particularly clever activity tracker wrist band. It comes as a new and upgraded version of the Jawbone UP – featuring upgrades such as Bluetooth Smart syncing with your Apple or Android smartphone.

While you could argue that anything regarding your work out sessions could very well be handled by your health app on your phone, you are only partly correct. Most phones, including the most recent ones and their respective operating systems do indeed count your steps and even your heart rate in some circumstances. But in reality, the data depicted by these devices is valid only for the times that you actually took your phone with you wherever you went.

In case of the Jawbone UP24, things are a bit different. Naturally, as long as you’ll have the wristband equipped as you go around your daily business, data will be recorded; so you can get a better and more accurate reading of your daily activity. Furthermore, the Jawbone UP24 is equipped to do more than just count steps: it can monitor your sleeping cycles and help you when it comes to your diet just as well. All in all, the Jawbone UP24 is up and out to help you gain a better understanding and control of your health.

The UP24 comes as an upgrade to the previous Jawbone UP, for a $29.99 increase in price. The perks that we found in the Jawbone UP vs Jawbone UP24 battle? Viewing data in real-time. If anything, the UP24 provides a more complete experience in comparison to its original variant. But before anything, let’s go through everything that the Jawbone UP24 has to offer, and which of its features are worth considering it for.

Jawbone UP24 Design

Aesthetically, the Jawbone UP24 can be considered one of the better options that you get in terms of fitness trackers. That highly depends on taste however: do you prefer your fitness tracker to take on the form of a watch or do you prefer a simple band that you can camouflage along with your other jewelry or clothing instead?

Jawbone UP24 Color Variants

While we can’t say that the UP24 is a fashion statement by itself, the reason it may win over other products of this class is its very simplistic and smooth design. With either a textured rubber exterior, featuring swirls or simple wavy lines or the more classic smooth design, the Jawbone UP24 is made to be simple and discreet. There are 3 variants when it comes to the Jawbone UP24 sizing you can choose from, and each comes with a different design. The smallest displays a line pattern that snakes from top to bottom, while the medium and large variants hold onto the plain and smooth design.

Thanks to the very light build, you won’t even notice it when you have the Jawbone UP24 equipped: the small version weighs 19 grams, while the medium is 22 and the largest is 23 grams respectively. That’s considerably lower than many of the competing gadgets – an explainable fact given that most other fitness trackers out there have opted for various types of on-band displays. This is one aspect that some people may not be particularly happy about – even on the latest iterations of the Jawbone wristbands, Jawbone UP3 or UP4, a screen has yet to be implemented, underlining the company’s attempt at keeping things as subtle as possible.

Jawbone UP24 Sizing

The Jawbone UP24 is made of medical-grade rubber which has been treated with a number of hypoallergenic substances in order to ensure nobody has any unfortunate side effects when starting to wear the band. However, even if all of the technology is neatly hidden inside the rubber exterior, this particular fitness tracker has not yet become water proof. This comes as a tremendous downside for some considering that you should always make a mental note of taking it off because going into the pool or even the shower. Furthermore, if by any unfortunate incident it happens to rain outside while you’re on your morning jog, you should be wary.

Part of the reason the band has yet to be made waterproof is the end of the wristband that hides the 2.5 mm charging connector underneath a metallic door. That, along with the other end of the fitness tracker that hides the syncing button, are not made to resist to fluids entering beneath them yet. And that can surely mess up with the system just like it would with any other electronic device.

Jawbone UP24 Charging pins

In the absence of any sort of display that would give you the chance to view at least the status of your wristband, most of the controls over the wristband will be done via its mobile app. There are, however, two green LEDs hidden behind the external rubber layer that will light up when you press the sync button – a moon and a flower for off and on respectively.

Jawbone UP24 LEDs

Jawbone UP24 LED

Jawbone UP24 Features & Utility

So what are the most basic functions of the Jawbone UP24? Besides the actual activity monitor that is responsible for tracking daily physical activity, the UP24 makes a point of giving you a more ample type of control over the health aspects of your life. Allegedly a tool that was made to give you a method of starting to take ownership of your life and not one that professionals and most advanced fitness fans will opt for, the Jawbone UP24 now turns its attention to the other factors of health too. You can use it, surely along with the application that it comes with, to track the intake of calories you score on a daily basis as well as get a good overview of how well you’re sleeping. Thanks to its extensive app, you can set yourself goals and targets that you can slowly make your way into.

Jawbone UP24 Features

The way that the data is recorded is via a tri-axis accelerometer – the same technology that is adopted in many of the other types of fitness trackers. Basically, what it does it measure acceleration in a tri-dimensional space, being able to differentiate between the moments when for example you’re in your car and when you’re walking or running. The same kind of sensor is used to track your sleep too – but that part may prove to be a little less accurate than you would expect. While this is a fact that is present in all kinds of fitness trackers, you may find that your Jawbone UP24 may not always detect the correct state you are in – whether you’re asleep or not.

Once the motion sensor detects you’re asleep, it can do as much as map an entire diagram of your sleeping cycles – however, only based on predefined algorithms, and not a direct method of measuring it. One previous that has, to some degree, been fixed was the fact that you had to manually set your UP24 on sleep mode when you went to bed and, similarly, take it out once you awoke in order to get a good reading of your sleep cycles. With the Jawbone UP24, you get the Sleep Recovery Mode which acts as sort of a backup for the times when you forget to sync your wristband with the mobile app in order to track data.

One of the greatest parts of what the Jawbone UP24 and the upgrades it brings over the classic UP is that it allows all the data to be exchanged with the host device via Bluetooth Smart syncing. By not having to use either your Internet traffic or, even worse, a cable to sync your data regularly and manually, the app will always be up to date with your daily progress thanks to the real-time updating of the information received.

Jawbone UP24 App

Not so much regarding the device but the app that it comes with, but one of the most iconic features of the Jawbone UP24 is the Insight engine – something that you will get all the chances of experiencing via your mobile phone. What this particular aspect of the app does is analyze your personal data, tracks and recordings in order to offer you a list of recommendations based on your particular habits and wishes. These recommendations range from more default or generic-oriented kind of knowledge towards actual methods of improving your health and life through various things the app picks up from your usual eating behaviors or sleeping patterns.

Another thing that the developers put a high degree of thinking in in order to maximize your experience is not only bringing its own input of motivation for the wearer as well as giving him or her the chance of phrasing their own wishes and expectations. Things such as amount of time you sleep, the time you go to bed, the amount of water you drink or how long you spend doing exercise are all valid goals you can set yourself via the app, together with settings alarms and notifications to give you a nudge to do so when the time comes.

All in all, the UP24 Jawbone makes a great effort to not only convince you to pick up good habits, but hold onto them as well and discipline you in order to develop a proactive type of thinking in this regard. As an extra method of providing you continuous feedback regarding your performance and progress, you can set up your account to also send you a weekly report of your step count and status of your sleep. And while some may not find this small detail as useful, you can also set the wrist band to send you nudges by vibrating when you haven’t been moving for long – for example when working on the computer, thus prompting and reminding you to take a 5 minute break every hour or so and stand up.

Jawbone UP24 App

Every single ounce of information and control you will get over this fitness wristband can be seen and managed through the Jawbone UP24 Android or iOS application. That means that any device running anything beyond Android 4.3 Jelly Bean as well as any device that is iPhone 4S and above (including iPads and iPods) will be compatible with the Jawbone 3.0 app. One downside is that there is no way for you to install the application on your computer for example. The only available download is an updater that is meant to upgrade the wristband’s firmware when connected to the computer via USB.

Jawbone UP24 Main Screen

Setting up your app is relatively easy. Once you have set up an account via e-mail and turned Bluetooth on for your phone, you can sync the two devices. There is one detail that some may find a bit of a nuisance: the way the Jawbone UP24 hard reset is done doesn’t allow you to start the data collection from scratch, and sadly if you want to start over completely you will require a new account – which in turn means you will need to use another e-mail too.

As soon as you turn the app on, you are prompted to press the sync button on the band once you’ve enabled Bluetooth. Once the two devices are connected, you will be presented with the main screen of the app. Here you will be able to find the step count and sleeping bars, followed by personal records that you’ve acquired up to that moment. On the left side you can scroll down through an entire menu of options starting with profile and ending with settings. Here is where you will be able to view your overall statistics, set up alerts, goals and trends.

Jawbone UP24 App Overview

It’s great that the application actually allows you to import information from a large number of other health-centric applications, thus providing you with a central hub for all of your information that you can afterwards observe. Even Jawbone itself has started releasing auxiliary applications that you can track other aspects of your life with such as caffeine intake.

The way the app keeps track of your calories intake is not automatic and instead has you basically keep a log of the things you consume, only to have the app provide you with the information if it has it recorded; otherwise, it will allow you to set it up manually. You can upload information regarding your diet by either scanning a product, typing it its name, uploading an image of it or looking through the database that is already built into the app.

Jawbone UP24 App

Jawbone 24UP Battery & Verdict

The first thing that came to mind when I first heard of the Jawbone UP24 was, for some reason, the iWatch that also attempted integrating features of a fitness tracker in its operating system. Then I recalled the disappointing battery life on it and for a second considered that the UP24 might have the same issue.

Thankfully, it’s nowhere near the battery life of a smart watch. Mostly because it has no display to speak of and minimal power consumption because of the Bluetooth Connectivity over other means, you will find yours lasting you from a few days to a week. Only powered by a 32 mAh Lithium-Ion Polymer battery hidden inside, not only that charging it won’t be something that you’ll keep having to remind yourself on a regular basis, but charging generally shouldn’t take longer than an hour and a half, meaning you can very well do it while you’re taking a bath and getting ready for bed or watching your favorite show.

The Jawbone UP24 is the kind of fitness tracker that, as we have mentioned before, is more so aimed at people who are just beginning to brush up on their lifestyles from a health perspective. By no means insufficient in terms of data provided and assistance with keeping healthy, but this particular fitness wristband falls behind in the Jawbone UP24 vs Fitbit Flex battle, or when put up against the more advanced, professional Garmin Vivoactive. It’s not a device meant for an intensive sports life, but instead attempts to help you keep up with your needs for a healthy lifestyle when you live a busy schedule.

Furthermore, in comparison to other fitness trackers, you will find that the Jawbone UP24 is more on the affordable end of the deal. While professional sports wearables can take you as far as $350 depending on their capabilities and technology packed, the UP24 will only go as far as $129.99.

So as a final note, if you feel that you don’t need an advanced piece of gadgetry just to keep track of what you eat, how well you sleep and how much you move on a daily basis, there is literally no reason to go for a bigger alternative and should instead give the Jawbone 24UP a glance. If that is not the case, however, you may want to look towards something else – and prepare to whip out a few extra bucks for it too of course.

Image Source: 1, 2, 3, 4, 5, 6, 7, 8, 9, 10, 11

Filed Under: Headlines Tagged With: Fitness Tracker, jawbone activity tracker, jawbone fitness tracker, jawbone up24, jawbone up24 review

New Japanese Supercomputer Targeting Number 1 Position

November 17, 2015 By Michael Turner Leave a Comment

The current Japanese Supercomputer K, about to be replaced by the new Japanese supercomputer.

Barely about 70 years have passed since the first acknowledged computer in the modern sense came into being, namely the ENIAC in 1946, though there is a debate whether the British Colossus of 1943 deserves that title, or even the Atanasoff–Berry computer (ABC) first shown publicly in 1937.

Regardless of which of these ancestors you choose as “origin” though, you have to stand in awe of the massive leaps in… everything that Computer Science and all the other connected technological domains have made since then. I mean processing power, storage, design, human-computer interface, you name it. The computers we have today are in my subjective opinion, as evolved to those first computers as a sophisticated modern human to a primate.

And we have now reached a new level. Where more is desired than just a “plain” modern computer. Researches across the world have already developed supercomputers and are working on improving these technological wonder’s performance even further (not to mention changing the game considerably if we take into account research and progress being done with regard to quantum computers).

So, in this context, there should be no surprise that there is a race currently going on. For who can build the fastest supercomputer to dethrone the current title holder, the Chinese Tianhe-2 with a top performance of a boggling 54.9 petaflops.

To put things into perspective: the petaflop is the measuring unit for processing speed. One petaflop equals a quadrillion floating point operations per second (FLOPS). Now multiply that by 54.9 and you get the idea of how fast the currently fastest supercomputer can process floating point operations. I know, it’s hard to conceive doing just 2 or 3 of them simultaneously as a human…

But that’s a cinch compared to the goals that the three top participants in this race have set for themselves. China wants to beat its own record by making a supercomputer that can operate at 100 petaflops. The USA have announced a 180 petaflops capable system to be released by 2019 and Japan has just announced plans to release a new supercomputer by 2020 to replace its currently third-place holder, the K, which operates at 10.5 petaflops thanks to the 705,204 processing cores it is equipped with.

More details on the new Japanese supercomputer are being given to the public today at at the Supercomputer 15 conference in Austin, Texas.

What is clear so far is that Japan has declared its intentions to make the new K able to offer 100 more times application performance than its predecessor and that the same research institution that developed the current K will also develop the new one, in collaboration with Fujitsu and also that the system will be based on a Linux Operating System.

Image source: 1.

Filed Under: Headlines Tagged With: Japanese K, Japanese supercomputer, Japanese supercomputer K, new Japanese K, new Japanese supercomputer

Secure Islands Make Microsoft Azure Security Better

November 10, 2015 By Michael Turner Leave a Comment

Microsoft Azure Security just got better with Microsoft acquiring Secure Islands.

In case you’re not familiar with Microsoft Azure, it is a cloud computing platform who uses a global network of data centers managed by Microsoft or hosted by its partners to allow its users to build, deploy and manage services and applications through it.

It was formerly named Windows Azure in 2010 when it was released, and then it was changed to Microsoft Azure in 2014, though you will find it referred to as Microsoft Azure Cloud Services on the net as well.

Regarding how Microsoft protects the data that circulates on this cloud computing platform, it’s worth mentioning right at the start that the company had acquired not one but two security firms already to deal specifically with cloud security. This September, Adallom for 300 million $ and last year, for 200 million $, Aorato, a startup. Both of them Israeli.

But apparently, Microsoft is taking this issue really serious, judging by their most recent, third, acquisition, the also Israeli based company Secure Islands, which they confirmed on the 9th of November.

Thought the exact sum Microsoft paid for the company has not been disclosed and only rumors of a range from 77 million $ to 150 million $ exist, the fact that Secure Islands make Microsoft Azure security better is clear, judging by the credentials it has for using its technology to keep data safe and sound, as evinced by Credit Suisse and Vodafone entrusting Secure Islands with this task.

Add to that the fact that Secure Islands already had products designed to work for Microsoft Sharepoint and Microsoft Exchange and it looks like the move that Microsoft made to acquire them was a very logical one that benefits both companies and ensures a smooth and efficient transition.

Because Microsoft will get a new division which already took Microsoft’s products into account and knows how they work, making the creation, design and implementation of future products much easier. While Secure Islands gets the chance to greatly enlarge its existing customer base, by now catering to Microsoft customers world-wide and benefiting from the resources and innovation that Microsoft has at its disposal.

The reason for Microsoft acquiring three web security companies in a relatively short time-frame is clear to anyone interested in the tech industry which has been monitoring the recent news: hacks have been taking place, breaches have been exploited, data lost and vulnerabilities revealed (sometimes by security experts themselves) on a regular basis recently.

And the frequency of such troubles as these attacks pose seems to be getting higher, not lower.

So, the fact that Microsoft is fortifying its defenses should not be seen as an exaggeration, but as a sign of maturity and justified caution to be applauded.

Image source: 1.

Filed Under: Headlines Tagged With: Microsoft Azure, Microsoft Azure Cloud, Microsoft Azure Cloud Services, Microsoft Azure Security, Secure Islands, Secure Islands Microsoft Azure

  • « Previous Page
  • 1
  • …
  • 12
  • 13
  • 14
  • 15
  • 16
  • …
  • 26
  • Next Page »

Subscribe to Blog via Email

Enter your email address to subscribe to this blog and receive notifications of new posts by email.

Join 11 other subscribers

Recent Articles

police handcuffs man

German Man Probed In Poisoning That Killed 21 Employees Since 2000

June 29, 2018 By Kenneth Scott Leave a Comment

Chicken wings bar

Intoxicated South Carolina Man Punches Waitress Who Refused to Serve Him Alcohol

June 29, 2018 By Karen Jackson Leave a Comment

gaming

New Zealand gamer Who Flew Halfway Across The World for Virginia Teen Gets Shots By Her Mother

June 28, 2018 By Cristopher Hall Leave a Comment

party

Former Virginia Tech Freshman Sentenced to 50 Years in Prison for Stabbing a Girl to Death

June 28, 2018 By Roxanne Briean Leave a Comment

bonfire

British Couple Sentenced to Life in Prison for Torturing and Murdering French Nanny

June 27, 2018 By Deborah Campbell Leave a Comment

pay phone

Texas Father of Girl Disappeared in the 80s Ignored by Authorities

June 26, 2018 By Cristopher Hall Leave a Comment

bottled water

San Francisco Woman Threatened to Call Police on Girl Who Sold Ice Water for Disneyland Trip

June 25, 2018 By Roxanne Briean Leave a Comment

Maplewood Park

Missouri Man Robbed by Date and Accomplice in Park

June 22, 2018 By Nancy Young Leave a Comment

coding

New York Man Sentenced in Cyberstalking Former Girlfriend, Mailing Drugs to Her Dorm

June 22, 2018 By Deborah Campbell Leave a Comment

headphones

Bose Poised to Launch Sleepbuds, In-Ear Headphones That Help You Sleep

June 21, 2018 By Nancy Young Leave a Comment

Police light

Intoxicated Female Driver in Custody for Pulling Arresting Officer by the Hair

June 21, 2018 By Kenneth Scott Leave a Comment

kitchen

Restaurant Manager Arrested and Charged in Shooting Death of Co-Worker over Negative Yelp Reviews

June 20, 2018 By Karen Jackson Leave a Comment

plastic container

Pennsylvania Couple Charged in Violent Death of Infant Discovered Buried in Cat Litter

June 19, 2018 By Cristopher Hall Leave a Comment

tailpipe

Minnesota Teen Gets Head Stuck In Oversized Tailpipe Winstock Music Festival

June 18, 2018 By Karen Jackson Leave a Comment

Pages

  • About Us
  • Contact us
  • Privacy Policy
  • Privacy Policy GDPR
  • Staff
  • Terms and Conditions

Recent Posts

  • German Man Probed In Poisoning That Killed 21 Employees Since 2000 June 29, 2018
  • Intoxicated South Carolina Man Punches Waitress Who Refused to Serve Him Alcohol June 29, 2018
  • New Zealand gamer Who Flew Halfway Across The World for Virginia Teen Gets Shots By Her Mother June 28, 2018
  • Former Virginia Tech Freshman Sentenced to 50 Years in Prison for Stabbing a Girl to Death June 28, 2018
  • British Couple Sentenced to Life in Prison for Torturing and Murdering French Nanny June 27, 2018
  • Texas Father of Girl Disappeared in the 80s Ignored by Authorities June 26, 2018
  • San Francisco Woman Threatened to Call Police on Girl Who Sold Ice Water for Disneyland Trip June 25, 2018

Categories

  • Business
  • Entertainment
  • Finance
  • Headlines
  • Health
  • Life
  • Nature
  • Science
  • Sports
  • Tech & Science
  • Travel
  • Uncategorized
  • United States
  • World

Copyright © 2026 ArgyllFreePress.com
About · Privacy Policy · Terms of Use · Contact